ບົດສອນ: Tic-Tac-Toe
ທ່ານຈະໄດ້ເຮັດເກມ tic-tac-toe ນ້ອຍໆລະຫວ່າງບົດສອນນີ້. ບົດສອນນີ້ບໍ່ໄດ້ສົມມຸດວ່າທ່ານມີຄວາມຮູ້ກ່ຽວກັບ React ຢູ່ແລ້ວ. ເຕັກນິກທີ່ທ່ານຈະໄດ້ຮຽນໃນບົດສອນນີ້ແມ່ນພື້ນຖານການສ້າງແອັບ React, ແລະ ການທຳຄວາມເຂົ້າໃຈຢ່າງຕັ້ງໃຈມັນຈະຊ່ວຍໃຫ້ທ່ານເຂົ້າໃຈເລິງເຊິງກ່ຽວກັບ React.
ບົດຮຽນນີ້ແມ່ນໄດ້ແບ່ງອອກເປັນຫຼາຍສ່ວນ:
- ການຕັ້ງຄ່າສຳລັບບົດຮຽນ ຈະໃຫ້ທ່ານເຫັນ ຈຸດເລີ່ມຕົ້ນ ເພື່ອປະຕິບັດຕາມບົດຮຽນ.
- ພາບລວມ ຈະສອນທ່ານ ພື້ນຖານ ຂອງ React: components, props, ແລະ state.
- ການຈົບເກມ ຈະສອນທ່ານ ເຕັກນິກທີ່ພົບເລື້ອຍ ໃນການພັດທະນາ React.
- ການເພີ່ມ time travel ຈະເຮັດໃຫ້ທ່ານ ມີຄວາມເຂົ້າໃຈເລິກເຊິງຂຶ້ນ ໃນຈຸດແຂງທີ່ເປັນເອກະລັກຂອງ React.
ທ່ານກຳລັງສ້າງຫຍັງ?
ໃນບົດຮຽນນີ້, ທ່ານຈະໄດ້ສ້າງເກມ tic-tac-toe ທີ່ມີການຕອບໂຕ້ດ້ວຍ React.
ທ່ານສາມາດເບິ່ງວ່າຮູບລັກສະນະມັນຈະເປັນແບບໃດຫຼັງຈາກທີ່ເຮັດສຳເລັດແລ້ວບ່ອນນີ້:
import { useState } from 'react';

function Square({ value, onSquareClick }) {
  return (
    <button className="square" onClick={onSquareClick}>
      {value}
    </button>
  );
}

function Board({ xIsNext, squares, onPlay }) {
  function handleClick(i) {
    if (calculateWinner(squares) || squares[i]) {
      return;
    }
    const nextSquares = squares.slice();
    if (xIsNext) {
      nextSquares[i] = 'X';
    } else {
      nextSquares[i] = 'O';
    }
    onPlay(nextSquares);
  }

  const winner = calculateWinner(squares);
  let status;
  if (winner) {
    status = 'Winner: ' + winner;
  } else {
    status = 'Next player: ' + (xIsNext ? 'X' : 'O');
  }

  return (
    <>
      <div className="status">{status}</div>
      <div className="board-row">
        <Square value={squares[0]} onSquareClick={() => handleClick(0)} />
        <Square value={squares[1]} onSquareClick={() => handleClick(1)} />
        <Square value={squares[2]} onSquareClick={() => handleClick(2)} />
      </div>
      <div className="board-row">
        <Square value={squares[3]} onSquareClick={() => handleClick(3)} />
        <Square value={squares[4]} onSquareClick={() => handleClick(4)} />
        <Square value={squares[5]} onSquareClick={() => handleClick(5)} />
      </div>
      <div className="board-row">
        <Square value={squares[6]} onSquareClick={() => handleClick(6)} />
        <Square value={squares[7]} onSquareClick={() => handleClick(7)} />
        <Square value={squares[8]} onSquareClick={() => handleClick(8)} />
      </div>
    </>
  );
}

export default function Game() {
  const [history, setHistory] = useState([Array(9).fill(null)]);
  const [currentMove, setCurrentMove] = useState(0);
  const xIsNext = currentMove % 2 === 0;
  const currentSquares = history[currentMove];

  function handlePlay(nextSquares) {
    const nextHistory = [...history.slice(0, currentMove + 1), nextSquares];
    setHistory(nextHistory);
    setCurrentMove(nextHistory.length - 1);
  }

  function jumpTo(nextMove) {
    setCurrentMove(nextMove);
  }

  const moves = history.map((squares, move) => {
    let description;
    if (move > 0) {
      description = 'Go to move #' + move;
    } else {
      description = 'Go to game start';
    }
    return (
      <li key={move}>
        <button onClick={() => jumpTo(move)}>{description}</button>
      </li>
    );
  });

  return (
    <div className="game">
      <div className="game-board">
        <Board xIsNext={xIsNext} squares={currentSquares} onPlay={handlePlay} />
      </div>
      <div className="game-info">
        <ol>{moves}</ol>
      </div>
    </div>
  );
}

function calculateWinner(squares) {
  const lines = [
    [0, 1, 2],
    [3, 4, 5],
    [6, 7, 8],
    [0, 3, 6],
    [1, 4, 7],
    [2, 5, 8],
    [0, 4, 8],
    [2, 4, 6],
  ];
  for (let i = 0; i < lines.length; i++) {
    const [a, b, c] = lines[i];
    if (squares[a] && squares[a] === squares[b] && squares[a] === squares[c]) {
      return squares[a];
    }
  }
  return null;
}
ຖ້າ code ຍັງບໍ່ສົມເຫດສົມຜົນສຳລັບທ່ານເທື່ອ, ຫຼື ຖ້າທ່ານຍັງບໍ່ທັນຄຸ້ນເຄີຍກັບ syntax ຂອງ code, ບໍ່ຕ້ອງຫ່ວງ! ເປົ້າໝາຍຂອງບົດສອນນີ້ແມ່ນຊ່ວຍໃຫ້ທ່ານມີຄວາມເຂົ້າໃຈ React ແລະ syntax ຂອງມັນ
ພວກເຮົາແນະນຳທ່ານລອງເກມ tic-tac-toe ດ້ານເທິງກ່ອນສຶບຕໍ່ບົດສອນ. ໜຶ່ງໃນຄຸນສົມບັດຫຼັກທີ່ທ່ານສາມາດສັງເກດໄດ້ແມ່ນມີລາຍການຕົວເລກດ້ານຂວາມືຂອງກະດານ. ລາຍການນີ້ສະແດງປະຫວັດຂອງການເຄື່ອນທີ່ທັງໝົດທີ່ເກີດຂຶ້ນໃນເກມ, ແລະ ອັບເດດເມື่ອເກມດຳເນີນໄປ.
ເມືອທ່ານໄດ້ຫຼິ້ນຈົນຈົບເກມ tic-tac-toe, ໃຫ້ເລື່ອນໄປເລື້ອຍໆ. ທ່ານຈະເລີ່ມຈາກ template ງ່າຍໆໃນບົດສອນນີ້. ຂັ້ນຕອນຕໍ່ໄປຂອງເຮົາແມ່ນການຕັ້ງຄ່າໃຫ້ທ່ານສາມາດເລີ່ມສ້າງເກມໄດ້.
ການຕັ້ງຄ່າສຳລັບບົດຮຽນ
ໃນ live code editor ຄິກ Fork ໃນເບື້ອງຂວາທາງເທິງເພື່ອເປີດ editor ໃນແທັບໃໝ່ໂດຍໃຊ້ເວັບໄຊ CodeSandbox. CodeSandbox ໃຫ້ທ່ານຂຽນ code ໃນບາວເຊີ ແລະ ເບິ່ງຕົວຢ່າງວ່າຜູ້ໃຊ້ງານຈະເຫັນແອັບທີ່ທ່ານສ້າງຂຶ້ນແນວໃດ. ແທັບໃໝ່ຄວນຈະສະແດງປ່ອງສີ່ຫຼ່ຽມເປົ່າ ແລະ code ເລີ່ມຕົ້ນສຳລັບບົດຮຽນນີ້.
export default function Square() {
  return <button className="square">X</button>;
}
ພາບລວມ
ປັດຈຸບັນທ່ານພ້ອມແລ້ວ, ມາເບິ່ງພາບລວມຂອງ React!
ກວດ code ເລີ່ມຕົ້ນ
ໃນ CodeSandbox ທ່ານຈະເຫັນ 3 ສ່ວນຫຼັກ:
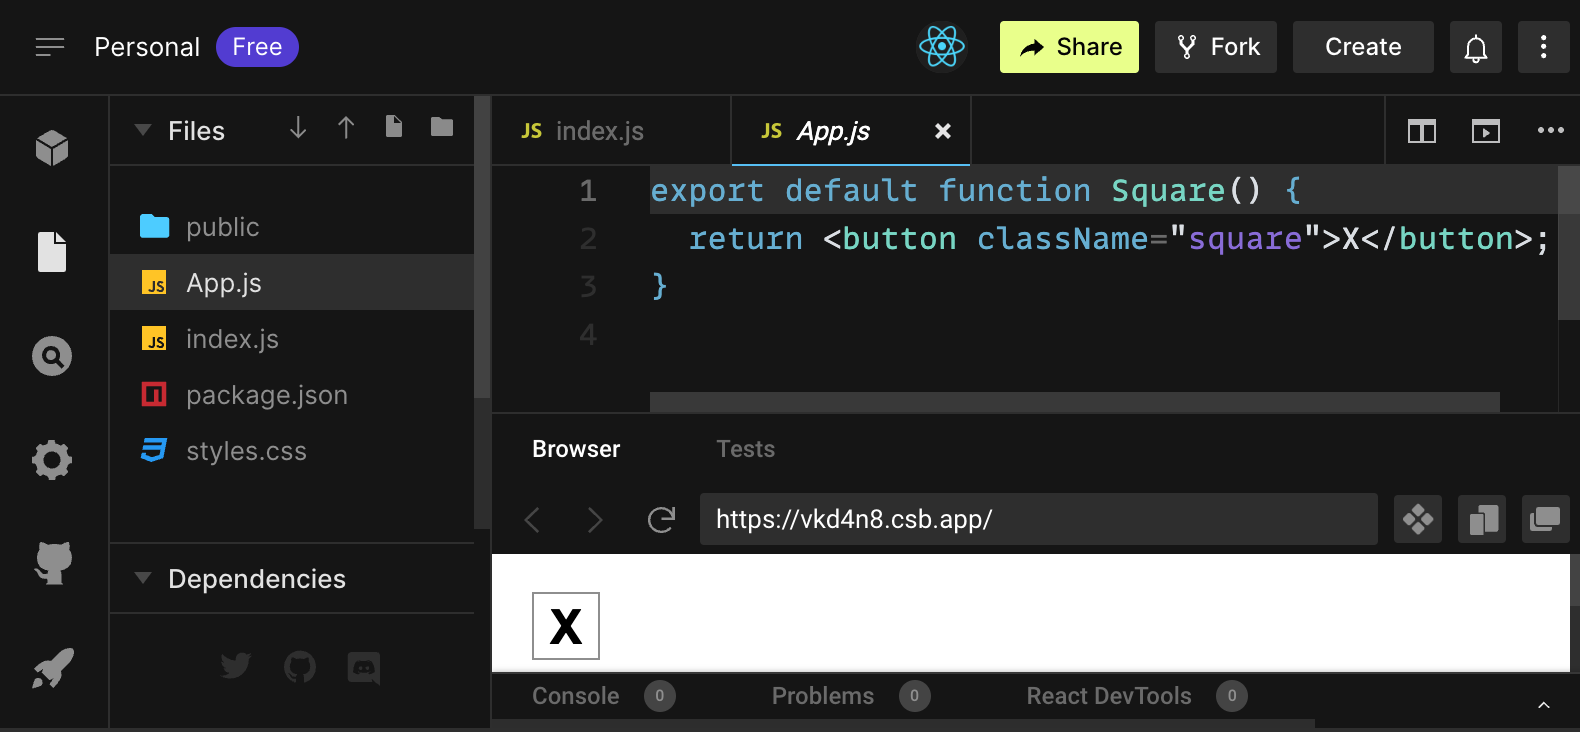
- ຫົວຂໍ້ Files ດ້ວຍລາຍການຂອງຟາຍເຊັ່ນ:
App.js,index.js,styles.cssແລະ ໂຟເດີທີ່ຊື່ວ່າpublic - ສ່ວນ code editor ບ່ອນທີ່ທ່ານຈະເຫັນ source code ຂອງຟາຍທີ່ທ່ານເລືອກ
- ສ່ວນ browser ບ່ອນທີ່ທ່ານຈະໄດ້ເຫັນ code ທີ່ທ່ານຂຽນນັ້ນສະແດງຜົນ
ຟາຍ App.js ຄວນຖືກເລືອກໃນຫົວຂໍ້ Files. ເນື້ອໃນຂອງຟາຍ ໃນ code editor ຄວນມີດັ່ງນີ້:
export default function Square() {
  return <button className="square">X</button>;
}
ສ່ວນຂອງ browser ຄວນສະແດງສີ່ຫຼ່ຽມພ້ອມເຄື່ອງໝາຍ X ແບບນີ້:

ຕອນນີ້ມາເບິ່ງ code ເລີ່ມຕົ້ນໃນຟາຍ.
App.js
Code ໃນ App.js ສ້າງ a component. ໃນ React, component ແມ່ນຊີ້ນສ່ວນຂອງ code ທີ່ໃຊ້ຊໍ້າໄດ້ເຊິ່ງໄດ້ສະແດງສ່ວນໜຶ່ງຂອງ user interface . Components ແມ່ນໃຊ້ສຳລັບສະແດງ, ຈັດການ ແລະ ອັບເດດ UI element ໃນແອັບພິເຄຊັ່ນຂອງທ່ານ. ມາເບິ່ງ component ໃນແຕ່ລະແຖວວ່າມີຫຍັງແນ່:
export default function Square() {
  return <button className="square">X</button>;
}
ແຖວທຳອິດປະກາດຟັງຊັ່ນຊື່ວ່າ Square. Keyword export ຂອງ JavaScript ເຮັດໃຫ້ຟັງຊັ່ນນີ້ສາມາດເຂົ້າເຖິງໄດ້ຈາກພາຍນອກຟາຍນີ້. keyword default ບອກຟາຍອື່ນໃຫ້ໃຊ້ code ຂອງທ່ານທີ່ເປັນຟັງຊັ່ນຫຼັກໃນຟາຍຂອງທ່ານ.
export default function Square() {
  return <button className="square">X</button>;
}
ແຖວທີ່ສອງ return ປຸ່ມກົດ. Keyword return ຂອງ JavaScript ມີຄວາມໝາຍວ່າແມ່ນຫຍັງກໍຕາມທີ່ມານຳຫຼັງຈະ return ເປັນຄ່າໃຫ້ຜູ້ໃຊ້ຟັງຊັ່ນ. <button ແມ່ນ JSX element. JSX element ແມ່ນການລວມກັນຂອງ code JavaScript ແລະ ແທັກ HTML ທີ່ນຳສະເໜີສິ່ງທີ່ທ່ານຕ້ອງການສະແດງ. className="square" ແມ່ນ property ຫຼື prop ຂອງປຸ່ມກົດທີ່ບອກ CSS ວິທີການ style ປຸ່ມກົດ. X ແມ່ນຂໍ້ຄວາມທີ່ສະແດງຢູ່ພາຍໃນປຸ່ມກົດ ແລະ </button> ປິດ JSX element ເພື່ອໃຫ້ຮູ້ວ່າທຸກໆເນື້ອຫາຕໍ່ໄປບໍ່ຄວນຈະຖືກວາງໄວ້ພາຍໃນປຸ່ມກົດ.
styles.css
ຄິກໃສ່ຟາຍທີ່ມີຊື່ວ່າ style.css ໃນສ່ວນຂອງ Files ຢູ່ໃນ CodeSandbox. ຟາຍນີ້ປະກາດ style ສຳລັບແອັບ React ຂອງທ່ານ. ສອງ CSS selectors (* ແລະ body) ທຳອິດ ປະກາດ style ສ່ວນໃຫຍ່ຂອງແອັບທ່ານໃນຂະນະທີ່ selector .square ປະກາດ style ຂອງ component ທີ່ໃຊ້ property className ເປັນ square. ໃນ code ຂອງທ່ານ, ນັ້ນຈະກົງກັບປຸ່ມກົດຈາກ Component Square ໃນຟາຍ App.js ຂອງທ່ານ.
index.js
ຄິກໃສ່ຟາຍທີ່ມີຊື່ index.js ໃນສ່ວນຂອງ Files ຢູ່ໃນ CodeSandbox. ທ່ານບໍ່ສາມາດແກ້ໄຂຟາຍໃນລະຫວ່າງການຮຽນນີ້ແຕ່ມັນສາມາດເຊື່ອມໂຍງ component ທີ່ທ່ານສ້າງໃນຟາຍ App.js ແລະ ເວັບບາວເຊີ.
import { StrictMode } from 'react';
import { createRoot } from 'react-dom/client';
import './styles.css';

import App from './App';
ແຖວທີ 1-5 ແມ່ນລວມສ່ວນທີ່ຈຳເປັນມາລວມກັນ:
- React
- Library React ເພື່ອສື່ສານກັບເວັບບາວເຊີ (React DOM)
- Style ຂອງ Component ທ່ານ
- Component ທີ່ທ່ານສ້າງໃນ
App.js.
ສ່ວນທີ່ເຫຼືອຂອງຟາຍຈະເອົາຊີ້ນສ່ວນທັງໝົດມາລວມກັນ ແລະ ເຮັດເປັນ final product ລົງໃນ index.html ໃນໂຟນເດີ public
ການສ້າງກະດານ
ກັບຄືນໄປທີ່ App.js. ນີ້ແມ່ນບ່ອນທີ່ທ່ານຈະໃຊ້ເວລາຫຼາຍກັບບົດຮຽນ.
ປັດຈຸບັນ ກະດານມີແຕ່ໜຶ່ງສີ່ຫຼ່ຽມ, ແຕ່ທ່ານຕ້ອງການ 9! ຖ້າທ່ານລອງແຕ່ copy paste ສີ່ຫຼ່ຽມຂອງທ່ານເພື່ອໃຫ້ເປັນສອງອັນດັ່ງນີ້:
export default function Square() {
  return <button className="square">X</button><button className="square">X</button>;
}
ທ່ານຈະໄດ້ຮັບຂໍ້ຜິດພາດນີ້:
<>...</>?Component React ຕ້ອງການ return ໜຶ່ງ JSX element ແລະ ບໍ່ສາມາດສົ່ງ JSX ທີ່ຕິດພັນຫຼາຍອັນເຊັ່ນ ສອງປຸ່ມກົດ. ເພື່ອແກ້ໄຂບັນຫານີ້ທ່ານສາມາດໃຊ້ fragments (<> ແລະ </>) ເພື່ອລວມ JSX ທີ່ຕິດພັນຫຼາຍອັນດັ່ງນີ້:
export default function Square() {
  return (
    <>
      <button className="square">X</button>
      <button className="square">X</button>
    </>
  );
}
ຕອນນີ້ທ່ານຄວນເຫັນ:

ເກັ່ງຫຼາຍ! ຕອນນີ້ທ່ານພຽງແຕ່ copy-paste ບໍ່ເທົ່າໃດເທື່ອເພື່ອເພີ່ມ 9 ສີ່ຫຼ່ຽມ ແລະ …

ຫະ! ສີ່ຫຼ່ຽມທັງໝົດແມ່ນຢູ່ແຖວດຽວກັນ, ບໍ່ໄດ້ຢູ່ໃນ grid ແບບທີ່ທ່ານຕ້ອງການຢູ່ໃນກະດານ. ເພື່ອແກ້ໄຂບັນຫານີ້ທ່ານຕ້ອງໄດ້ group ສີ່ຫຼ່ຽມໃຫ້ເປັນແຖວດ້ວຍ <div> ແລະ ເພີ່ມບາງ class CSS. ໃນຂະນະທີ່ທ່ານກຳລັງເຮັດ, ທ່ານຈະໃສ່ໂຕເລກແຕ່ລະສີ່ຫຼ່ຽມເພື່ອໃຫ້ແນ່ໃຈວ່າແຕ່ລະສີ່ຫຼ່ຽມຈະສະແດງບ່ອນໃດ.
ໃນຟາຍ App.js, ອັບເດດ component Square ໜ້າຕາປະມານນີ້:
export default function Square() {
  return (
    <>
      <div className="board-row">
        <button className="square">1</button>
        <button className="square">2</button>
        <button className="square">3</button>
      </div>
      <div className="board-row">
        <button className="square">4</button>
        <button className="square">5</button>
        <button className="square">6</button>
      </div>
      <div className="board-row">
        <button className="square">7</button>
        <button className="square">8</button>
        <button className="square">9</button>
      </div>
    </>
  );
}
CSS ທີ່ກຳນົດໃນ styles.css ແມ່ນໄດ້ style divs ດ້ວຍ className ຂອງ board-row. ຕອນນີ້ທ່ານໄດ້ group Component ຂອງທ່ານເປັນແຖວດຽວດ້ວຍ style ຂອງ div ທີ່ທ່ານມີໃນກະດານ tic-tac-toe:
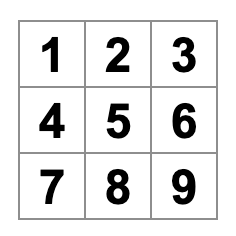
ແຕ່ທ່ານກຳລັງມີບັນຫາ. Component ຊື່ Square ຂອງທ່ານ, ບໍ່ໄດ້ເປັນຮູບສີ່ຫຼ່ຽມອີກຕໍ່ໄປ. ມາແກ້ໄຂມັນໂດຍການປ່ຽນຊື່ເປັນ Board:
export default function Board() {
  //...
}
ໃນຈຸດນີ້ code ຂອງທ່ານຄວນໜ້າຕາປະມານນີ້:
export default function Board() {
  return (
    <>
      <div className="board-row">
        <button className="square">1</button>
        <button className="square">2</button>
        <button className="square">3</button>
      </div>
      <div className="board-row">
        <button className="square">4</button>
        <button className="square">5</button>
        <button className="square">6</button>
      </div>
      <div className="board-row">
        <button className="square">7</button>
        <button className="square">8</button>
        <button className="square">9</button>
      </div>
    </>
  );
}
ສົ່ງຂໍ້ມູນຜ່ານ props
ຕໍ່ໄປ, ທ່ານຕ້ອງການປ່ຽນຄ່າຂອງສີ່ຫຼ່ຽມຈາກຄ່າເປົ່າເປັນ “X” ເມື່ອຜູ້ໃຊ້ຄິກສີ່ຫຼ່ຽມ. ໂດຍວິທີທີ່ທ່ານສ້າງກະດານຈົນມາຮອດນີ້ ທ່ານຈະຕ້ອງ copy-paste code ທີ່ອັບເດດສີ່ຫຼ່ຽມ 9 ເທື່ອ (ເຮັດເທື່ອລະສີ່ຫຼ່ຽມທີ່ທ່ານມີ)! ແທນທີ່ຈະ copy-past, ສະຖາປັກຕະຍະກຳ Component React ຊ່ວຍໃຫ້ທ່ານສ້າງ component ທີ່ໃຊ້ຊໍ້າໄດ້ເພື່ອຫຼີກຫຼ່ຽງ code ທີ່ມີຄວາມສັບສົນ, ແລະ ຊໍ້າຊ້ອນ.
ທຳອິດ, ທ່ານຈະຕ້ອງ copy ແຖວທີ່ປະກາດສີ່ຫຼ່ຽມທຳອິດ (<button className="square">1</button>) ຈາກ Component Board ໄປໃສ່ໃນ Component Square ໃໝ່:
function Square() {
  return <button className="square">1</button>;
}

export default function Board() {
  // ...
}
ຈາກນັ້ນທ່ານອັບເດດ Component Board ເພື່ອສະແດງ Component Square ໂດຍໃຊ້ syntax JSX:
// ...
export default function Board() {
  return (
    <>
      <div className="board-row">
        <Square />
        <Square />
        <Square />
      </div>
      <div className="board-row">
        <Square />
        <Square />
        <Square />
      </div>
      <div className="board-row">
        <Square />
        <Square />
        <Square />
      </div>
    </>
  );
}
ສັງເກດເຫັນຄວາມແຕກຕ່າງຂອງບາວເຊີ div component Board ແລະ Square ຕ້ອງເລີ່ມຕົ້ນດ້ວຍໂຕພິມໃຫຍ່.
ມາເບິ່ງ:
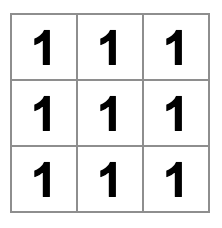
ຫະ! ທ່ານໄດ້ເສຍຕົວເລກໃນສີ່ຫຼ່ຽມທີ່ທ່ານມີກ່ອນໜ້ານີ້. ຕອນນີ້ແຕ່ລະສີ່ຫຼ່ຽມສະແດງ “1”. ເພື່ອແກ້ໄຂ, ທ່ານຈະໄດ້ໃຊ້ props ເພື່ອສົ່ງຜ່ານແຕ່ລະຄ່າທີ່ສີ່ຫຼ່ຽມຄວນມີຈາກ parent component (Board) ໄປຫາ child ຂອງມັນ (Square).
ອັບເດດ component Square ເືພ່ອອ່ານ value prop ທີ່ທ່ານຈະສົ່ງຈາກ Board:
function Square({ value }) {
  return <button className="square">1</button>;
}
function Square({ value }) ບົ່ງບອກວ່າ component Square ສາມາດສົ່ງ props ທີ່ເອີ້ນວ່າ value.
ຕອນນີ້ທ່ານຕ້ອງການສະແດງ value ນັ້ນແທນທີຈະເປັນ 1 ໃນທຸກໆສີ່ຫຼ່ຽມ. ລອງເຮັດແບບນີ້:
function Square({ value }) {
  return <button className="square">value</button>;
}
ອຸບ~~, ນີ້ບໍ່ແມ່ນສິ່ງທີ່ທ່ານຕ້ອງການ:
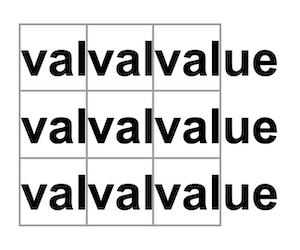
ທ່ານຕ້ອງການສະແດງຕົວແປ JavaScript ຊື່ວ່າ value ຈາກ component ຂອງທ່ານ, ບໍ່ແມ່ນຄຳວ່າ “value”. ເພື່ອ “escape into JavaScriopt” ຈາກ JSX, ທ່ານຕ້ອງການວົງປີກກາ. ເພີ່ມວົງປີກກາລະຫວ່າງ value ໃນ JSX ແບບນີ້:
function Square({ value }) {
  return <button className="square">{value}</button>;
}
ສຳລັບຕອນນີ້, ທ່ານຄວນເຫັນກະດານທີ່ວ່າງເປົ່າ:
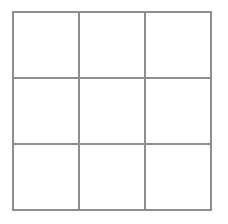
ນີ້ເປັນເພາະວ່າ component Board ບໍ່ໄດ້ສົ່ງ prop value ໄປໃຫ້ແຕ່ລະ component Square ເພື່ອສະແດງເທື່ອ. ເພື່ອແກ້ໄຂທ່ານຕ້ອງເພີ່ມ prop value ໃນແຕ່ລະ component Square ທີ່ສະແດງໂດຍ component Board:
export default function Board() {
  return (
    <>
      <div className="board-row">
        <Square value="1" />
        <Square value="2" />
        <Square value="3" />
      </div>
      <div className="board-row">
        <Square value="4" />
        <Square value="5" />
        <Square value="6" />
      </div>
      <div className="board-row">
        <Square value="7" />
        <Square value="8" />
        <Square value="9" />
      </div>
    </>
  );
}
ຕອນນີ້ທ່ານຄວນເຫັນ grid ຂອງຕົວເລກອີກຄັ້ງ:

code ທີ່ອັບເດດຂອງທ່ານຄວນຄ້າຍຄືແບບນີ້:
function Square({ value }) {
  return <button className="square">{value}</button>;
}

export default function Board() {
  return (
    <>
      <div className="board-row">
        <Square value="1" />
        <Square value="2" />
        <Square value="3" />
      </div>
      <div className="board-row">
        <Square value="4" />
        <Square value="5" />
        <Square value="6" />
      </div>
      <div className="board-row">
        <Square value="7" />
        <Square value="8" />
        <Square value="9" />
      </div>
    </>
  );
}
ການເຮັດໃຫ້ Component ມີການໂຕ້ຕອບ
ມາເຕີມ component Square ດ້ວຍ X ເມື່ອທ່ານຄິກມັນ. ປະກາດຟັງຊັ່ນຊື່ວ່າ handleClick ພາຍໃນ Square. ຫຼັງຈາກນັ້ນ, ເພີ່ມ onClick ໃສ່ props ຂອງປຸ່ມກົດ JSX element ທີ່ return ຈາກ Square:
function Square({ value }) {
  function handleClick() {
    console.log('clicked!');
  }

  return (
    <button
      className="square"
      onClick={handleClick}
    >
      {value}
    </button>
  );
}
ຖ້າທ່ານຄິກໃສ່ສີ່ຫຼ່ຽມຕອນນີ້, ທ່ານຄວນຈະເຫັນ log ທີ່ສະແດງ "clicked!" ໃນແທັບ Console ທີ່ຢູ່ດ້ານລຸ່ມຂອງ Browser ໃນ CodeSandbox. ການຄິກສີ່ຫຼ່ຽມຫຼາຍກວ່າໜຶ່ງຄັ້ງຈະສະແດງ "clicked!" ອີກຄັ້ງ. ການເຮັດຊໍ້າ console log ດ້ວຍຂໍ້ຄວາມເກົ່າຈະບໍ່ສ້າງແຖວໃໝ່ໃນ console. ກົງກັນຂ້າມ, ທ່ານຈະເຫັນຕົວເລກການເພີ່ມຂຶ້ນດ້ານຫຼັງຂອງຄຳວ່າ "clicked!".
ໃນຂັ້ນຕອນຕໍ່ໄປ, ທ່ານຕ້ອງການໃຫ້ component Square ເພື່ອ “ຈື່” ວ່າມັນໄດ້ຖືກຄິກແລ້ວ, ແລະ ເຕີມມັນດ້ວຍເຄື່ອງໝາຍ “X”. ເພື່ອ “ຈື່” ຄ່າຕ່າງໆ, comopnent ໃຊ້ state.
React ມີຟັງຊັ່ນພິເສດເອີ້ນວ່າ useState ທີ່ທ່ານສາມາດເອີ້ນຈາກ component ຂອງທ່ານເພື່ອໃຫ້ “ຈື່” ຄ່າ. ມາເກັບຄ່າຂອງ Square ໃນ state, ແລະ ປ່ຽນມັນເມື່ອ Square ຖືກຄິກ.
Import useState ເທິງສຸດຂອງຟາຍ. ລຶບ prop value ຈາກ component Square. ກົງກັນຂ້າມ, ເພີ່ມແຖວໃໝ່ດ້ານໜ້າຂອງ Square ທີ່ເອີ້ນ useSate. ໃຫ້ສົ່ງຄືນຕົວແປທີ່ຊື່ value:
import { useState } from 'react';

function Square() {
  const [value, setValue] = useState(null);

  function handleClick() {
    //...
value ເກັບຄ່າ ແລະ setValue ແມ່ນຟັງຊັ່ນທີ່ໃຊ້ເພື່ອປ່ຽນແປງຄ່າ. ຄ່າ null ທີ່ສົ່ງຜ່ານໄປຫາ useState ເພື່ອໃຊ້ເປັນຄ່າເລີ່ມຕົ້ນຂອງຕົວແປ state ນີ້, ສະນັ້ນ value ມີຄ່າເລີ່ມຕົ້ນເປັນ null.
ຕັ້ງແຕ່ component Square ບໍ່ໄດ້ຮັບ prop ອີກຕໍ່ໄປ, ທ່ານຈະໄດ້ລຶບ prop value ຈາກ 9 component Square ທີ່ຖືກສ້າງໂດຍ component Board:
// ...
export default function Board() {
  return (
    <>
      <div className="board-row">
        <Square />
        <Square />
        <Square />
      </div>
      <div className="board-row">
        <Square />
        <Square />
        <Square />
      </div>
      <div className="board-row">
        <Square />
        <Square />
        <Square />
      </div>
    </>
  );
}
ຕອນນີ້ທ່ານຈະໄດ້ປ່ຽນ Square ເພື່ອສະແດງ “X” ຕອນຖືກຄິກ. ແທນທີ console.log("clicked!"); event handler ດ້ວຍ setValue('X');. ປັດຈຸບັນ component Square ຈະໜ້າຕາປະມານນີ້:
function Square() {
  const [value, setValue] = useState(null);

  function handleClick() {
    setValue('X');
  }

  return (
    <button
      className="square"
      onClick={handleClick}
    >
      {value}
    </button>
  );
}
ໂດຍການເອີ້ນຟັງໃຊ້ set ນີ້ຈາກ onClick handler, ທ່ານກຳລັງບອກໃຫ້ React ເພື່ອສະແດງ Square ຄືນໃໝ່ ເມື່ອໃດກໍຕາມທີ <button> ຖືກຄິກ. ຫຼັງຈາກມີການປ່ຽນແປງ, value ຂອງ Square ຈະມີຄ່າເປັນ 'X', ດັ່ງນັ້ນທ່ານຈິງເຫັນ
“X” ໃນກະດານເກມ. ຄິກໃສ່ ສີ່ຫຼ່ຽມບ່ອນໃດກໍໄດ້, ແລະ “X” ຄວນຈະສະແດງ:
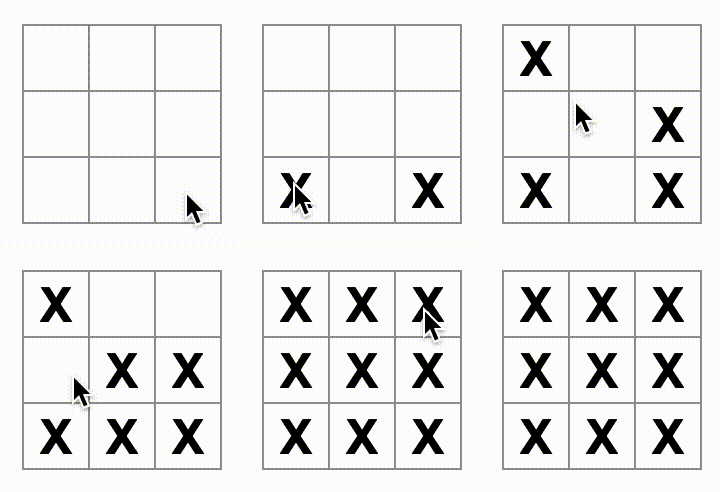
ແຕ່ລະສີ່ຫຼ່ຽມມີ state ເປັນຂອງຕົວເອງ: value ຖືກເກັບໄວ້ໃນແຕ່ລະສີ່ຫຼ່ຽມຢ່າງອິດສະຫຼະຈາກກັນ. ເມື່ອທ່ານເອີ້ນຟັງຊັ່ນ set ໃນ component, React ຈະອັບເດດ child component ພາຍໃນໂດຍອັດຕະໂນມັດຄືກັນ.
ຫຼັງຈາກທີ່ທ່ານໄດ້ທຳການປ່ຽນແປງດ້ານເທິງ, code ຂອງທ່ານຈະເປັນແບບນີ້:
import { useState } from 'react';

function Square() {
  const [value, setValue] = useState(null);

  function handleClick() {
    setValue('X');
  }

  return (
    <button
      className="square"
      onClick={handleClick}
    >
      {value}
    </button>
  );
}

export default function Board() {
  return (
    <>
      <div className="board-row">
        <Square />
        <Square />
        <Square />
      </div>
      <div className="board-row">
        <Square />
        <Square />
        <Square />
      </div>
      <div className="board-row">
        <Square />
        <Square />
        <Square />
      </div>
    </>
  );
}
React Developer Tools
React DevTools ຊ່ວຍໃຫ້ທ່ານກວດ prop ແລະ state ຂອງ Component React ຂອງທ່ານ. ທ່ານສາມາດຫາແທັບ React DevTools ໃນດ້ານລຸ່ມຂອງສ່ວນ browser ໃນ CodeSandbox:
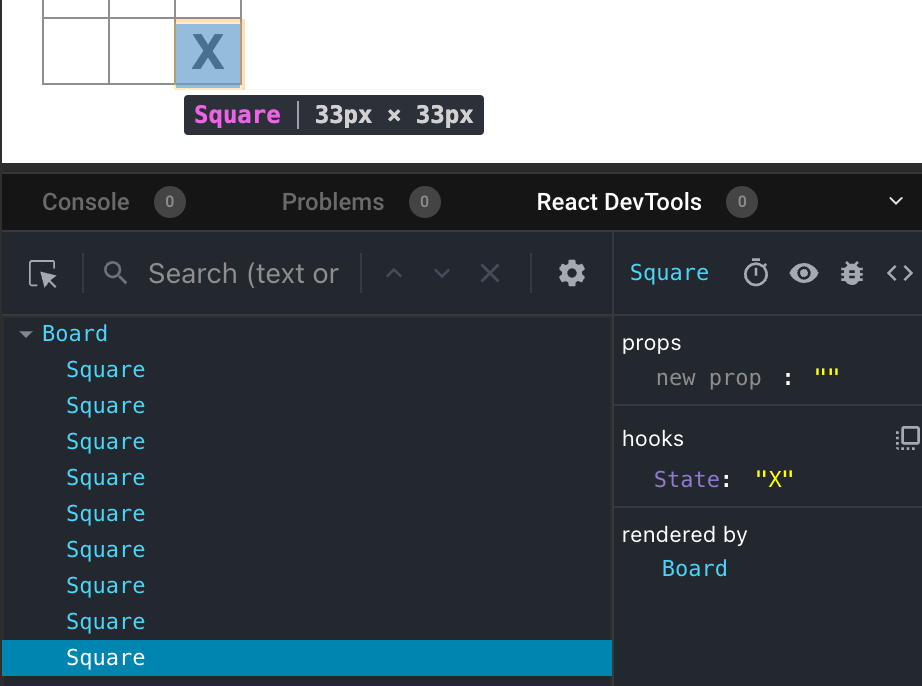
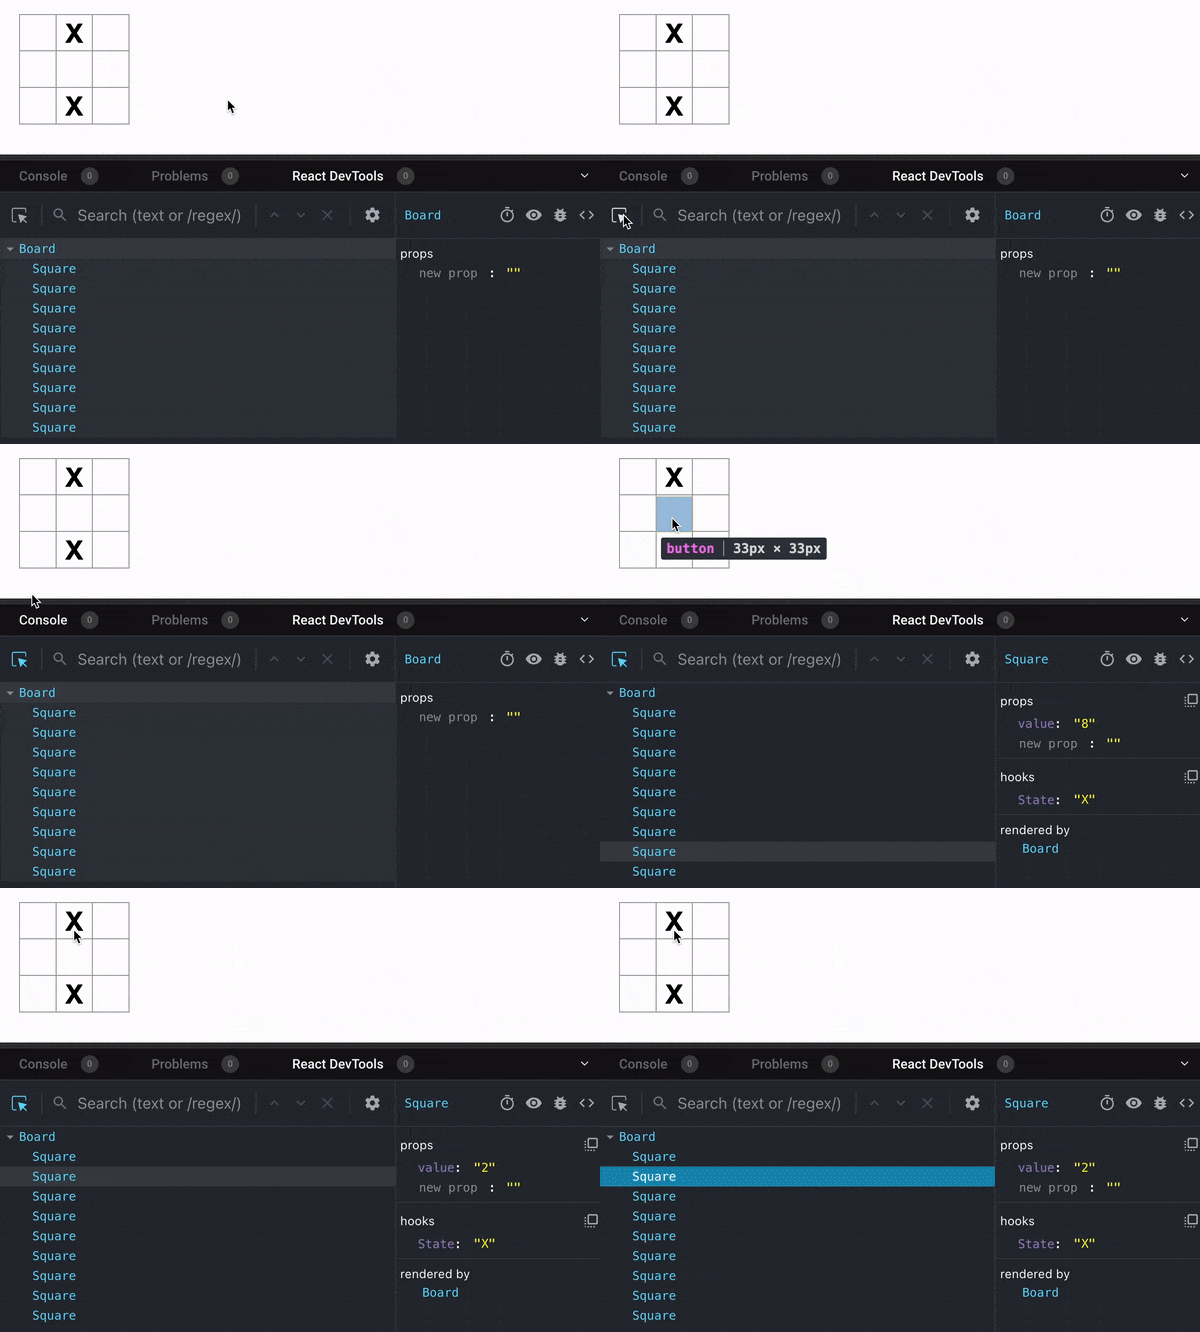
ເພື່ອກວດແຕ່ລະ component ເທິງໜ້າຈໍ, ໃຊ້ປຸ່ມທີ່ຢູ່ມຸມຊ້າຍດ້ານເທິງຂອງ React DevTools:
ເຮັດເກມໃຫ້ແລ້ວ
ໃນຈຸດນີ້, ທ່ານມີພື້ນຖານໃນການສ້າງ block ສຳລັບເກມ tic-tac-toe. ເພື່ອເຮັດໃຫ້ເກມສຳເລັດ, ຕອນນີ້ທ່ານຕ້ອງວາງ “X” ແລະ “O” ສະລັບກັນເທິງກະດານ, ແລະ ທ່ານຕ້ອງການວິທີການຕັດສິນຜູ້ຊະນະ.
ການຍົກ state ຂຶ້ນ
ປັດຈຸບັນ, ແຕ່ລະ component Square ເບິ່ງສ່ວນ state ຂອງເກມ. ເພື່ອກວດຫາຜູ້ຊະນະໃນເກມ tic-tac-toe, Board ຈຳເປັນຕ້ອງໄດ້ຮູ້ state ຂອງແຕ່ລະ component Square.
ທ່ານຈະເຂົ້າໃກ້ສິ່ງນີ້ໄດ້ແນວໃດ? ຕອນທຳອິດ, ທ່ານອາດຈະເດົາໄດ້ວ່າ Board ຕ້ອງການ “ຂໍ” ແຕ່ລະ Square ສຳລັບ state ຂອງ Square. ເຖິງວ່າສິ່ງນີ້ດ້ານເຕັກນິກຈະເປັນໄປໄດ້ໃນ React, ພວກເຮົາບໍ່ແນະນຳເພາະວ່າ code ຈະເຂົ້າໃຈຍາກ, ມີຂໍ້ຜິດພາດໄດ້ງ່າຍ, ແລະ ຍາກໃນການ refactor. ວິທີທີ່ດີທີ່ສຸດແມ່ນເກັບ state ເກມໃນ parent Board component ແທນໃນແຕ່ລະ Square. Component Board ສາມາດບອກແຕ່ລະ Square ວ່າຈະສະແດງຫຍັງແນ່ໂດຍການສົ່ງຜ່ານ props, ຄືກັບທີ່ທ່ານໄດ້ເຮັດເມືອສົ່ງຄ່າໂຕເລກໃຫ້ແຕ່ລະສີ່ຫຼ່ຽມ.
ເພື່ອຮວບຮ່ວມຂໍ້ມູນຈາກຫຼາຍ children,ຫຼື ສອງ child component ສື່ສານກັນ, ປະກາດ shared state ໃນ parent component ຂອງພວກມັນແທນ. Parent component ສາມາດສົ່ງ state ກັບຄືນຫາ children ດ້ວຍ props. ນີ້ເຮັດໃຫ້ child component sync ກັນ ແລະ ກັບ parent ຂອງມັນ.
ການຍົກ state ຂຶ້ນໄປຫາ parent component ເປັນເລື່ອງປົກະຕິເມື່ອ component React ຖືກ refactor.
ລອງຖືໂອກາດນີ້ລອງເບິ່ງ. ແກ້ໄຂ Component Board ເພື່ອໃຫ້ປະກາດຕົວແປ state ຊື່ squares ທີ່ມີຄ່າເລີ່ມຕົ້ນເປັນ 9 null ຂອງ array ທີ່ກົງກັບ 9 ສີ່ຫຼ່ຽມ
// ...
export default function Board() {
  const [squares, setSquares] = useState(Array(9).fill(null));
  return (
    // ...
  );
}
Array(9).fill(null) ສ້າງ array ດ້ວຍ 9 element ແລະ ຕັ້ງຄ່າພວກມັນເປັນ null. ການເອີ້ນໃຊ້ useState() ອ້ອມໆມັນປະກາດຕົວແປ state squares ທີ່ເລີ່ມຕົ້ນໃນ array ນັ້ນ. ແຕ່ລະລາຍການໃນ array ກົງກັບຄ່າໃນສີ່ຫຼ່ຽມ. ເມື່ອທ່ານເຕີມກະດານພາຍຫຼັງ, squares array ຈະມີໜ້າຕາປະມານນີ້:
['O', null, 'X', 'X', 'X', 'O', 'O', null, null]ຕອນນີ້ component Board ຂອງທ່ານຕ້ອງສົ່ງ prop value ລົງໄປຫາແຕ່ລະ Square ທີ່ສະແດງຜົນ:
export default function Board() {
  const [squares, setSquares] = useState(Array(9).fill(null));
  return (
    <>
      <div className="board-row">
        <Square value={squares[0]} />
        <Square value={squares[1]} />
        <Square value={squares[2]} />
      </div>
      <div className="board-row">
        <Square value={squares[3]} />
        <Square value={squares[4]} />
        <Square value={squares[5]} />
      </div>
      <div className="board-row">
        <Square value={squares[6]} />
        <Square value={squares[7]} />
        <Square value={squares[8]} />
      </div>
    </>
  );
}
ຕໍ່ມາ, ທ່ານຈະໄດ້ແກ້ໄຂ component Square ທີ່ຮັບຄ່າ prop value ຈາກ component Board. ສິ່ງນີ້ຈະລຶບການຕິດຕາມ stateful ຂອງ component Square ຂອງ value ແລະ prop onClick ຂອງປຸ່ມກົດ:
function Square({value}) {
  return <button className="square">{value}</button>;
}
ໃນຈຸດນີ້ທ່ານຄວນເຫັນບອດ tic-tac-toe ທີ່ວ່າງເປົ່າ:

ແລະ code ຂອງທ່ານຄວນເປັນແບບນີ້:
import { useState } from 'react';

function Square({ value }) {
  return <button className="square">{value}</button>;
}

export default function Board() {
  const [squares, setSquares] = useState(Array(9).fill(null));
  return (
    <>
      <div className="board-row">
        <Square value={squares[0]} />
        <Square value={squares[1]} />
        <Square value={squares[2]} />
      </div>
      <div className="board-row">
        <Square value={squares[3]} />
        <Square value={squares[4]} />
        <Square value={squares[5]} />
      </div>
      <div className="board-row">
        <Square value={squares[6]} />
        <Square value={squares[7]} />
        <Square value={squares[8]} />
      </div>
    </>
  );
}
ແຕ່ລະສີ່ຫຼ່ຽມຈະຮັບ prop value ເຊິ່ງຈະເປັນ 'X', 'O', ຫຼື null ສຳລັບສີ່ຫຼ່ຽມທີ່ວ່າງເປົ່າ.
ຕໍ່ມາ, ທ່ານຕ້ອງການປ່ຽນແປງສິ່ງທີ່ຈະເກີດຂຶ້ນເມື່ອ Square ຖືກຄິກ. component Board ຕອນນີ້ຮັກສາສີ່ຫຼ່ຽມທີ່ຖືກເຕີມ. ທ່ານຈະຕ້ອງສ້າງວິທີທີ່ Square ອັບເດດ state ຂອງ Board. ຕັ້ງແຕ່ state ເປັນ private ຂອງ component ທີ່ກຳນົດ, ທ່ານບໍ່ສາມາດອັບເດດ state ຂອງ Board ໄດ້ໂດຍກົງຈາກ Square.
ແຕ່ທ່ານຈະສົ່ງຕໍ່ຟັງຊັນຈາກ component Board ໄປຫາ component Square, ແລະ ທ່ານຈະມີ Square ທີ່ເອີ້ນຟັງຊັ່ນເມື່ອຄິກໃສ່ສີ່ຫຼ່ຽມ. ທ່ານຈະເລີ່ມຕົ້ນດ້ວຍຟັງຊັ່ນທີ່ component Square ຈະຖືກໃຊ້ງານເມື່ອຖືກຄິກ. ທ່ານຈະເອີ້ນຟັງຊັ່ນນັ້ນວ່າ onSquareClick:
function Square({ value }) {
  return (
    <button className="square" onClick={onSquareClick}>
      {value}
    </button>
  );
}
ຕໍ່ໄປ, ທ່ານຈະເພີ່ມຟັງຊັ່ນ onSquareClick ໃສ່ໃນ prop ຂອງ component Square:
function Square({ value, onSquareClick }) {
  return (
    <button className="square" onClick={onSquareClick}>
      {value}
    </button>
  );
}
ຕອນນີ້ທ່ານຈະເຊື່ອມຕໍ່ prop onSquareClick ໃສ່ຟັງຊັ່ນໃນ component Board ທີ່ທ່ານໃສ່ຊື່ວ່າ handleClick. ໃນການເຊື່ອມຕໍ່ onSquareClick ກັບ handleClick ທ່ານຈະຕ້ອງສົ່ງຜ່ານຟັງຊັນໄປຫາ prop onSquareClick ຂອງ component Square ທຳອິດ:
export default function Board() {
  const [squares, setSquares] = useState(Array(9).fill(null));

  return (
    <>
      <div className="board-row">
        <Square value={squares[0]} onSquareClick={handleClick} />
        //...
  );
}
ທ້າຍສຸດ, ທ່ານຈະຕ້ອງກຳນົດຟັງຊັ່ນ handleClick ພາຍໃນ component Board ເພື່ອອັບເດດ array squares ທີ່ເກັບ state ຂອງ board:
export default function Board() {
  const [squares, setSquares] = useState(Array(9).fill(null));

  function handleClick() {
    const nextSquares = squares.slice();
    nextSquares[0] = "X";
    setSquares(nextSquares);
  }

  return (
    // ...
  )
}
ຟັງຊັ່ນ handleClick ສ້າງ copy ຂອງ array squares (nextSquares) ດ້ວຍ JavaScript slice() Array method. ຈາກນັ້ນ, handleClick ອັບເດດ array nextSquares ເພື່ອເພີ່ມ X ໃສ່ໃນສີ່ຫຼ່ຽມ ([0] index) ທຳອິດ.
ການເອີ້ນໃຊ້ຟັງຊັ່ນ setSqures ເຮັດໃຫ້ React ຮູ້ວ່າ state ຂອງ component ມີການປ່ຽນແປງ. ການດຳເນີນການນີ້ຈະກະຕຸ້ນການ render component ທີ່ໃຊ້ state squares (Board) ອີກຄັ້ງລວມເຖິງ child component ຂອງມັນ (component Square ທີ່ປະກອບເປັນກະດານ)
ຕອນນີ້ທ່ານສາມາດເພີ່ມ X ລົງໃນກະດານໄດ້… ແຕ່ສະເພາະສີ່ຫຼ່ຽມດ້ານເທິງເບື້ອງຊ້າຍເທົ່ານັ້ນ. ຟັງຊັ່ນ handleClick ຂອງທ່ານໄດ້ຮັບການ hard code ເພື່ອອັບເດດ index ສຳລັບປ່ອງສີ່ຫຼ່ຽມດ້ານເທິງເບື້ອງຊ້າຍ (0). ມາອັບເດດ handleClick ເພື່ອໃຫ້ສາມາດອັບເດດສີ່ຫຼ່ຽມໃດກໍໄດ້. ເພີ່ມ argument i ໃຫ້ກັບຟັງຊັ່ນ handleClick ທີ່ຮັບ index ຂອງສີ່ຫຼ່ຽມເພື່ອອັບເດດ:
export default function Board() {
  const [squares, setSquares] = useState(Array(9).fill(null));

  function handleClick(i) {
    const nextSquares = squares.slice();
    nextSquares[i] = "X";
    setSquares(nextSquares);
  }

  return (
    // ...
  )
}
ຕໍ່ໄປ, ທ່ານຈະຕ້ອງສົ່ງ i ນັ້ນໄປຍັງ handleClick. ທ່ານສາມາດລອງຕັ້ງຄ່າ prop onSquareClick ຂອງສີ່ຫຼ່ຽມເປັນ handleClick(0) ໂດຍກົງໃນ JSX ແບບນີ້, ແຕ່ຈະເຮັດວຽກບໍ່ໄດ້:
<Square value={squares[0]} onSquareClick={handleClick(0)} />ນີ້ແມ່ນສາເຫດທີ່ບໍ່ເຮັດວຽກ. ການເອີ້ນ handleClick(0) ຈະເປັນສ່ວນໜຶ່ງຂອງການ render component board. ເພາະວ່າ handleClick(0) ປ່ຽນແປງ state ຂອງ component board ໂດຍການເອີ້ນ setSquares component ຂອງ board ທັງໝົດຈະຖືກ render ໃໝ່ອີກຄັ້ງ. ແຕ່ມັນຈະແລ່ນ handleClick(0) ອີກຄັ້ງ, ແລະ ນຳພາໄປສູ່ການ loop ທີ່ບໍ່ສິ້ນສຸດ:
ເປັນຫຍັງກ່ອນໜ້ານີ້ມັນບໍ່ເກີດບັນຫາ?
ເມື່ອທ່ານຜ່ານ onSquareClick={handleClick}, ທ່ານກຳລັງສົ່ງຟັງຊັ່ນ handleClick ລົງເປັນ prop. ທ່ານບໍ່ໄດ້ເອີ້ນໃຊ້ມັນ! ແຕ່ຕອນນີ້ທ່ານກຳລັງ ເອີ້ນໃຊ້ ຟັງຊັ່ນນັ້ນທັນທີ—ສັງເກດວົງເລັບໃນ handleClick(0) —ແລະ ນັ້ນແມ່ນສາເຫດທີ່ມັນເຮັດວຽກໄວເກີນໄປ. ທ່ານບໍ່ ຕ້ອງການ ເອີ້ນ handleClick ຈົນກວ່າຜູ້ໃຊ້ຈະຄິກ!
ທ່ານສາມາດແກ້ໄຂໂດຍການສ້າງຟັງຊັ່ນເຊັ່ນ handleFirstSquareClick ທີ່ເອີ້ນ handleClick(0), ຟັງຊັ່ນເຊັ່ນ handleSeconSquareClick ທີ່ເອີ້ນ handleClick(1) ແລະ ອື່ນໆ. ທ່ານຈະສົ່ງຜ່ານ (ແທນທີ່ຈະເອີ້ນໃຊ້) ຟັງຊັ່ນເຫຼົ່ານີ້ລົງມາເປັນ prop ເຊັ່ນ onSquareClick={handleFirstSquareClick}. ນີ້ຈະແກ້ໄຂບັນຫາການ loop ທີ່ບໍ່ສິ້ນສຸດ.
ເຖິງຢ່າງໃດກໍຕາມ, ການກຳນົດຟັງຊັ່ນທີ່ແຕກຕ່າງກັນ 9 ຟັງຊັ່ນ ແລະ ຕັ້ງຊື່ໃຫ້ກັບແຕ່ລະຟັງຊັ່ນນັ້ນມີລາຍລະອຽດຫຼາຍເກີນໄປ, ລອງເຮັດແບບນີ້ແທນ:
export default function Board() {
  // ...
  return (
    <>
      <div className="board-row">
        <Square value={squares[0]} onSquareClick={() => handleClick(0)} />
        // ...
  );
}
ສັງເກດ syntax () => ໃໝ່. ໂຕນີ້ () => handleClick(0) ແມ່ນ arrow function, ເຊິ່ງເປັນວິທີທີ່ສັ້ນກວ່າໃນການປະກາດຟັງຊັ່ນ. ເມື່ອສີ່ຫຼ່ຽມຖືກຄິກ, code ທີ່ຢູ່ຫຼັງ => “arrow” ຈະເຮັດວຽກ, ໂດຍເອີ້ນ handleClick(0).
ຕອນນີ້ທ່ານຕ້ອງອັບເດດສີ່ຫຼ່ຽມອີກ 8 ປ່ອງເພື່ອເອີ້ນ handleClick ຈາກ arrow function ທີ່ທ່ານສົ່ງ. ກວດສອບໃຫ້ແນ່ໃຈວ່າ argument ສຳລັບການເອີ້ນໃຊ້ handleClick ແຕ່ລະຄັ້ງສອດຄ່ອງກັບ index ຂອງສີ່ຫຼ່ຽມທີ່ຖືກຕ້ອງ:
export default function Board() {
  // ...
  return (
    <>
      <div className="board-row">
        <Square value={squares[0]} onSquareClick={() => handleClick(0)} />
        <Square value={squares[1]} onSquareClick={() => handleClick(1)} />
        <Square value={squares[2]} onSquareClick={() => handleClick(2)} />
      </div>
      <div className="board-row">
        <Square value={squares[3]} onSquareClick={() => handleClick(3)} />
        <Square value={squares[4]} onSquareClick={() => handleClick(4)} />
        <Square value={squares[5]} onSquareClick={() => handleClick(5)} />
      </div>
      <div className="board-row">
        <Square value={squares[6]} onSquareClick={() => handleClick(6)} />
        <Square value={squares[7]} onSquareClick={() => handleClick(7)} />
        <Square value={squares[8]} onSquareClick={() => handleClick(8)} />
      </div>
    </>
  );
};
ຕອນນີ້ທ່ານສາມາດເພີ່ມ X ລົງໃສ່ສີ່ຫຼ່ຽມໃດກໍໄດ້ເທິງກະດານໄດ້ອີກຄັ້ງໂດຍຄິກບ່ອນປ່ອງສີ່ຫຼ່ຽມ:

ແຕ່ຕອນນີ້ການຈັດການ state ທັງໝົດແມ່ນຖືກຈັດການໂດຍ component Board!
code ຂອງທ່ານຄວນເປັນແບບນີ້:
import { useState } from 'react';

function Square({ value, onSquareClick }) {
  return (
    <button className="square" onClick={onSquareClick}>
      {value}
    </button>
  );
}

export default function Board() {
  const [squares, setSquares] = useState(Array(9).fill(null));

  function handleClick(i) {
    const nextSquares = squares.slice();
    nextSquares[i] = 'X';
    setSquares(nextSquares);
  }

  return (
    <>
      <div className="board-row">
        <Square value={squares[0]} onSquareClick={() => handleClick(0)} />
        <Square value={squares[1]} onSquareClick={() => handleClick(1)} />
        <Square value={squares[2]} onSquareClick={() => handleClick(2)} />
      </div>
      <div className="board-row">
        <Square value={squares[3]} onSquareClick={() => handleClick(3)} />
        <Square value={squares[4]} onSquareClick={() => handleClick(4)} />
        <Square value={squares[5]} onSquareClick={() => handleClick(5)} />
      </div>
      <div className="board-row">
        <Square value={squares[6]} onSquareClick={() => handleClick(6)} />
        <Square value={squares[7]} onSquareClick={() => handleClick(7)} />
        <Square value={squares[8]} onSquareClick={() => handleClick(8)} />
      </div>
    </>
  );
}
ຕອນນີ້ການຈັດການ state ຂອງທ່ານຢູ່ໃນ component Board, parent component Board ຈະສົ່ງ prop ໄປຫາ child component Square ເພື່ອໃຫ້ສາມາດສະແດງຜົນໄດ້ຢ່າງຖືກຕ້ອງ. ເມື່ອຄິກ Square, child component Square ຈະຖາມ component Board ເພືອອັບເດດ state ຂອງກະດານ. ເມື່ອ state ຂອງ Board ມີການປ່ຽນແປງ, ທັງ component Board ແລະ child component Square ຈະ render ໃໝ່ໂດຍອັດຕະໂນມັດ. ການຮັກສາ state ຂອງສີ່ຫຼ່ຽມທັງໝົດໃນສ່ວນຂອງ component Board ຈະຊ່ວຍໃຫ້ສາມາດຕັດສິນຜູ້ຊະນະໃນອະນາຄົດ.
ເຮົາມາສະຫຼຸບສິ່ງທີ່ເກີດຂຶ້ນເມື່ອຜູ້ໃຊ້ຄິກປ່ອງສີ່ຫຼ່ຽມດ້ານເທິງເບື້ອງຊ້າຍເທິງກະດານຂອງທ່ານເພື່ອເພີ່ມ X ລົງໄປ:
- ການຄິກທີ່ປ່ອງສີ່ຫຼ່ຽມດ້ານເທິງເບື້ອງຊ້າຍເປັນການເອີ້ນໃຊ້ຟັງຊັ່ນທີ່
buttonໄດ້ຮັບ proponClickຈາກSquare. ComponentSquareໄດ້ຮັບຟັງຊັ່ນນັ້ນເປັນ proponSquareClickຈາກBoard. ComponentBoardກຳນົດຟັງຊັ່ນໂດຍກົງໃນ JSX ມັນເອີ້ນໃຊ້handleClockດ້ວຍ argument ເປັນ (0). handleClickໃຊ້ argument (0) ເພື່ອອັບເດດ element ທຳອິດຂອງ arraysquaresຈາກnullເປັນX.- state
squaresຂອງ componentBoardໄດ້ຮັບການອັບເດດ, ດັ່ງນັ້ນBoardແລະ children ຂອງມັນຈະ render ໃໝ່. ສິ່ງນີ້ເຮັດໃຫ້ propvalueຂອງ componentSquareທີ່ມີ index0ປ່ຽນຈາກnullເປັນX.
ໃນຕອນທ້າຍຜູ້ໃຊ້ຈະເຫັນວ່າປ່ອງດ້ານເທິງເບື້ອງຊ້າຍປ່ຽນຈາກວ່າງເປັນມີ X ຫຼັງຈາກກົດ.
ເປັນຫຍັງການ immutable ຈິງມີຄວາມສຳຄັນ
ສັງເກດວ່າໃນ handleClick, ທ່ານເອີ້ນ .slice() ເພື່ອສ້າງສຳເນົາຂອງ array squares ແທນທີຈະແກ້ໄຂ array ທີ່ມີຢູ່. ເພື່ອອະທິບາຍເຫດຜົນ, ເຮົາຈຳເປັນຕ້ອງໄດ້ສົນທະນາກ່ຽວກັບການ immutability ແລະ ເປັນຫຍັງ immutablity ຈຶ່ງມີຄວາມສຳຄັນໃນການຮຽນຮູ້.
ໂດຍທົ່ວໄປມີສອງວິທີໃນການປ່ຽນແປງຂໍ້ມູນ. ວິທີທຳອິດແມ່ນ mutate ຂໍ້ມູນໂດຍການປ່ຽນຄ່າຂອງຂໍ້ມູນໂດຍກົງ. ວິທີທີ່ສອງແມ່ນການແທນທີ່ຂໍ້ມູນດ້ວຍການສຳເນົາໃໝ່ທີ່ມີການປ່ຽນແປງຕາມຄວາມຕ້ອງການ. ນີ້ແມ່ນລັກສະນະທີ່ຈະເກີດຂຶ້ນເມື່ອທ່ານ mutate array ຂອງ squares:
const squares = [null, null, null, null, null, null, null, null, null];
squares[0] = 'X';
// Now `squares` is ["X", null, null, null, null, null, null, null, null];
ແລະ ນີ້ແມ່ນລັກສະນະທີ່ຈະເກີດຂຶ້ນເມື່ອທ່ານປ່ຽນຂໍ້ມູນໂດຍບໍ່ mutate array ຂອງ squares:
const squares = [null, null, null, null, null, null, null, null, null];
const nextSquares = ['X', null, null, null, null, null, null, null, null];
// Now `squares` is unchanged, but `nextSquares` first element is 'X' rather than `null`
ຜົນລັບຈະຄືກັນແຕ່ບໍມີການ mutate (ປ່ຽນແປງຂໍ້ມູນພື້ນຖານ) ໂດຍກົງ, ທ່ານຈະໄດ້ຮັບປະໂຫຍດຫຼາຍປະການ.
Immutability ເຮັດໃຫ້ feature ທີ່ຊັບຊ້ອນງ່າຍໃນການ implement. ພາຍຫຼັງໃນບົດຮຽນນີ້, ທ່ານຈະ implement “time travel” feature ທີ່ໃຫ້ທ່ານກວດປະຫວັດຂອງເກມ ແລະ “ກັບຄືນ” ໄປຫາການເຄື່ອນໄຫວທີ່ຜ່ານມາ. ຟັງຊັ່ນນີ້ບໍ່ສະເພາະແຕ່ເກມ—ຄວາມສາມາດໃນການ undo ແລະ redo ເປັນ action ທົ່ວໄປທີ່ຕ້ອງການສຳລັບແອັບຯ. ຫຼີກຫຼ່ຽງການ mutate ຂໍ້ມູນໂດຍກົງເຮັດໃຫ້ທ່ານສາມາດຮັກສາເວີຊັ່ນກ່ອນໜ້າຂອງຂໍ້ມູນໄວ້ໄດ້ ແລະ ນຳມາໃຊ້ໃນພາຍຫຼັງ.
ນອກນັ້ນຍັງມີປະໂຫຍດອີກປະການໜຶ່ງຂອງ immutability. ຕາມຄ່າເລີ່ມຕົ້ນ, child component ທັງໝົດຈະ render ໃໝ່ໂດຍອັດຕະໂນມັດເມື່ອ state ຂອງ parent component ມີການປ່ຽນແປງ. ເຊິ່ງລວມເຖິງ child component ທີ່ບໍ່ໄດ້ຮັບຜົນກະທົບຈາກການປ່ຽນແປງ. ເຖິງວ່າການ render ໃໝ່ຈະບໍ່ເຮັດໃຫ້ຜູ້ໃຊ້ສັງເກດເຫັນໄດ້ເອງ (ທ່ານບໍ່ຄວນພະຍາຍາມຫຼີກຫຼ່ຽງ!), ທ່ານອາດຕ້ອງການການຂ້າມການ render ໃໝ່ໃນສ່ວນຂອງ tree ທີ່ບໍ່ໄດ້ຮັບຜົນກະທົບຢ່າງຊັດເຈນດ້ວຍເຫດຜົນດ້ານປະສິດທິພາບ. Immutability ເຮັດໃຫ້ component ມີລາຄາຖືກຫຼາຍໃນການປຽບທຽບວ່າຂໍ້ມູນມີການປ່ຽນແປງ ຫຼື ບໍ່. ທ່ານສາມາດຮຽນຮູ້ເພີ່ມເຕີມກ່ຽວກັບວິທີທີ່ React ເລືອກເວລາ render component ໃໝ່ ໃນ memo API reference.
ການປ່ຽນຜຽນ
ເຖິງເວລາທີ່ຈະແກ້ໄຂບັນຫາທີ່ສຳຄັນໃນເກມ tic-tac-toe ນີ້: ບໍ່ສາມາດເຮັດເຄື່ອງໝາຍ “O” ເທິງກະດານໄດ້.
ທ່ານຈະຕັ້ງຄ່າການເຄື່ອນໄຫວທຳອິດເປັນ “X” ໂດຍຄ່າເລີ່ມຕົ້ນ. ມາຕິດຕາມສິ່ງນີ້ໂດຍການເພີ່ມ state ອີກສ່ວນໜຶ່ງໃຫ້ກັບ component ຂອງ Board:
function Board() {
  const [xIsNext, setXIsNext] = useState(true);
  const [squares, setSquares] = useState(Array(9).fill(null));

  // ...
}
ທຸກຄັ້ງທີ່ຜູ້ຫຼິ້ນເຄື່ອນ, xIsNext (ເປັນ boolean) ຈະຖືກພິກເພື່ອຕັດສິນວ່າຜູ້ຫຼິ້ນຄົນໃດຈະໄປຕໍ່ ແລະ state ຂອງເກມຈະຖືກບັນທຶກ. ທ່ານຈະອັບເດດຟັງຊັ່ນ handleClick ຂອງ Board ເພື່ອພິກຄ່າຂອງ xIsNext:
export default function Board() {
  const [xIsNext, setXIsNext] = useState(true);
  const [squares, setSquares] = useState(Array(9).fill(null));

  function handleClick(i) {
    const nextSquares = squares.slice();
    if (xIsNext) {
      nextSquares[i] = "X";
    } else {
      nextSquares[i] = "O";
    }
    setSquares(nextSquares);
    setXIsNext(!xIsNext);
  }

  return (
    //...
  );
}
ຕອນນີ້, ເມື່ອທ່ານຄິກໃສ່ປ່ອງສີ່ຫຼ່ຽມ, ມັນຈະສະຫຼັບກັນລະຫວ່າງ X ແລະ O, ດັ່ງທີ່ມັນຄວນຈະເປັນ!
ແຕ່ວ່າ, ມັນມີບັນຫາ. ລອງຄິກໃສ່ປ່ອງສີ່ຫຼ່ຽມຫຼາຍໆຄັ້ງ:
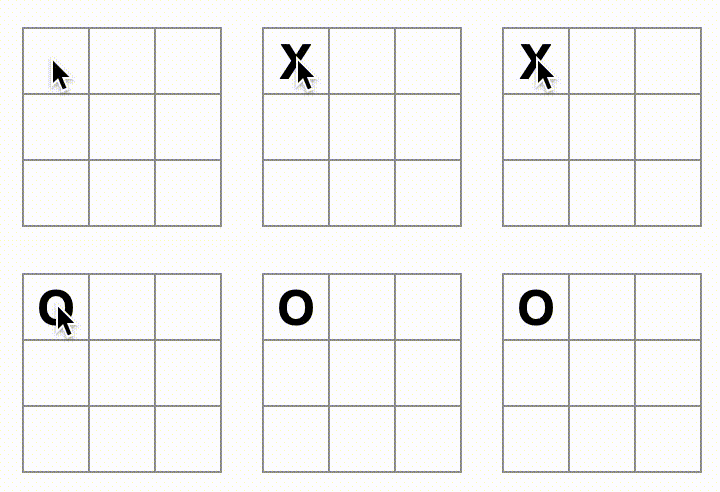
X ຖືກຂຽນທັບດ້ວຍ O! ເຖິງວ່າສິ່ງນີ້ຈະເພີ່ມຈຸດປ່ຽນທີ່ນ່າສົນໃຈໃຫ້ກັບເກມ, ແຕ່ເຮົາຈະຍຶດກົດດັ່ງເດີມສຳລັບຕອນນີ້.
ເມື່ອທ່ານເຮັດເຄື່ອງໝາຍດ້ວຍ X ຫຼື O ທ່ານຈະບໍ່ໄດ້ກວດສອບກ່ອນເພື່ອໃຫ້ຮູ້ວ່າສີ່ຫຼ່ຽມນັ້ນມີຄ່າ X ຫຼື O ຢູ່ແລ້ວ. ທ່ານສາມາດແກ້ໄຂໂດຍການ return ກ່ອນ. ທ່ານຈະກວດສອບວ່າສີ່ຫຼ່ຽມມີ X ຫຼື O ຢູ່ແລ້ວ. ຖ້າວ່າສີ່ຫຼ່ຽມມີແລ້ວ, ທ່ານຈະ return ດ້ວຍຟັງຊັ່ນ handleClick ກ່ອນ—ກ່ອນທີ່ລະບົບຈະພະຍາຍາມອັບເດດ state ຂອງ board.
function handleClick(i) {
  if (squares[i]) {
    return;
  }
  const nextSquares = squares.slice();
  //...
}
ຕອນນີ້ທ່ານສາມາດເພີ່ມ X ຫຼື 0 ໃນສີ່ຫຼ່ຽມວ່າງເທົ່ານັ້ນ! ນີ້ແມ່ນລັກສະນະຂອງ code ທ່ານຄວນມີລັກສະນະດັ່ງນີ້:
import { useState } from 'react';

function Square({value, onSquareClick}) {
  return (
    <button className="square" onClick={onSquareClick}>
      {value}
    </button>
  );
}

export default function Board() {
  const [xIsNext, setXIsNext] = useState(true);
  const [squares, setSquares] = useState(Array(9).fill(null));

  function handleClick(i) {
    if (squares[i]) {
      return;
    }
    const nextSquares = squares.slice();
    if (xIsNext) {
      nextSquares[i] = 'X';
    } else {
      nextSquares[i] = 'O';
    }
    setSquares(nextSquares);
    setXIsNext(!xIsNext);
  }

  return (
    <>
      <div className="board-row">
        <Square value={squares[0]} onSquareClick={() => handleClick(0)} />
        <Square value={squares[1]} onSquareClick={() => handleClick(1)} />
        <Square value={squares[2]} onSquareClick={() => handleClick(2)} />
      </div>
      <div className="board-row">
        <Square value={squares[3]} onSquareClick={() => handleClick(3)} />
        <Square value={squares[4]} onSquareClick={() => handleClick(4)} />
        <Square value={squares[5]} onSquareClick={() => handleClick(5)} />
      </div>
      <div className="board-row">
        <Square value={squares[6]} onSquareClick={() => handleClick(6)} />
        <Square value={squares[7]} onSquareClick={() => handleClick(7)} />
        <Square value={squares[8]} onSquareClick={() => handleClick(8)} />
      </div>
    </>
  );
}
ການປະກາດຫາຜູ້ຊະນະ
ເມື່ອຜູ້ຫຼິ້ນປ່ຽນກັນຫຼິ້ນໄດ້ແລ້ວ, ທ່ານຈະຕ້ອງການສະແດງໃຫ້ເຫັນວ່າເກມຊະນະຕອນໃດ ແລະ ບໍ່ຕ້ອງປ່ຽນຜຽນກັນອີກຕໍ່ໄປ. ເພື່ອເຮັດສິ່ງນີ້ທ່ານຕ້ອງໄດ້ເພີ່ມ helper ຟັງຊັ່ນຊື່ວ່າ calculateWinner ທີ່ໃຊ້ array ຂອງ 9 ສີ່ຫຼ່ຽມ, ກວດຫາຜູ້ຊະນະ ແລະ return 'X', 'O', ຫຼື null ຕາມຄວາມເໝາະສົມ. ບໍ່ຕ້ອງກັງວົນຫຼາຍເກີນໄປກ່ຽວກັບຟັງຊັ່ນ calculateWinner; ມັນບໍ່ໄດ້ສະເພາະເຈາະຈົງໃນ React:
export default function Board() {
  //...
}

function calculateWinner(squares) {
  const lines = [
    [0, 1, 2],
    [3, 4, 5],
    [6, 7, 8],
    [0, 3, 6],
    [1, 4, 7],
    [2, 5, 8],
    [0, 4, 8],
    [2, 4, 6]
  ];
  for (let i = 0; i < lines.length; i++) {
    const [a, b, c] = lines[i];
    if (squares[a] && squares[a] === squares[b] && squares[a] === squares[c]) {
      return squares[a];
    }
  }
  return null;
}ທ່ານຈະເອີ້ນໃຊ້ calculateWinner(squares) ໃນຟັງຊັ່ນ handleClick ຂອງ component Board ເພື່ອກວດສອບວ່າຜູ້ຫຼິ້ນຊະນະ ຫຼື ບໍ່. ທ່ານສາມາດດຳເນີນການກວດສອບນີ້ໄປພ້ອມກັບກວດສອບວ່າຜູ້ໃຊ້ຄິກປ່ອງສີ່ຫຼ່ຽມທີ່ມີ X ຫຼື O ຢູ່ແລ້ວ ຫຼື ບໍ່. ເຮົາຕ້ອງການ return ກ່ອນໃນສອງກໍລະນີ:
function handleClick(i) {
  if (squares[i] || calculateWinner(squares)) {
    return;
  }
  const nextSquares = squares.slice();
  //...
}
ເພື່ອໃຫ້ຜູ້ຫຼິ້ນຮູ້ເມື່ອເກມຈົບ, ທ່ານສາມາດສະແດງຂໍ້ຄວາມເຊັ່ນ: “Winner: X” ຫຼື “Winner: O”. ເພື່ອເຮັດສິ່ງນີ້ທ່ານຕ້ອງເພີ່ມສ່ວນ status ລົງໃນ component Board. Status ຈະສະແດງຜູ້ຊະນະຫາກເກມຈົບລົງ ແລະ ຖ້າເກມກຳລັງດຳເນີນຢູ່ທ່ານຈະເຫັນຜຽນຂອງຜູ້ຫຼິ້ນຄົນຕໍ່ໄປ:
export default function Board() {
  // ...
  const winner = calculateWinner(squares);
  let status;
  if (winner) {
    status = "Winner: " + winner;
  } else {
    status = "Next player: " + (xIsNext ? "X" : "O");
  }

  return (
    <>
      <div className="status">{status}</div>
      <div className="board-row">
        // ...
  )
}
ຍິນດີນຳ! ຕອນນີ້ທ່ານມີເກມ tic-tac-toe ທີ່ເຮັດວຽກໄດ້. ແລະ ທ່ານຫາກໍໄດ້ຮຽນຮູ້ພື້ນຖານຂອງ React ນຳ. ສະນັ້ນ ທ່ານ ຄືຜູ້ຊະນະຕົວຈິງໃນທີ່ນີ້. ນີ້ແມ່ນສິ່ງທີ່ code ຂອງທ່ານຄວນຈະເປັນ:
import { useState } from 'react';

function Square({value, onSquareClick}) {
  return (
    <button className="square" onClick={onSquareClick}>
      {value}
    </button>
  );
}

export default function Board() {
  const [xIsNext, setXIsNext] = useState(true);
  const [squares, setSquares] = useState(Array(9).fill(null));

  function handleClick(i) {
    if (calculateWinner(squares) || squares[i]) {
      return;
    }
    const nextSquares = squares.slice();
    if (xIsNext) {
      nextSquares[i] = 'X';
    } else {
      nextSquares[i] = 'O';
    }
    setSquares(nextSquares);
    setXIsNext(!xIsNext);
  }

  const winner = calculateWinner(squares);
  let status;
  if (winner) {
    status = 'Winner: ' + winner;
  } else {
    status = 'Next player: ' + (xIsNext ? 'X' : 'O');
  }

  return (
    <>
      <div className="status">{status}</div>
      <div className="board-row">
        <Square value={squares[0]} onSquareClick={() => handleClick(0)} />
        <Square value={squares[1]} onSquareClick={() => handleClick(1)} />
        <Square value={squares[2]} onSquareClick={() => handleClick(2)} />
      </div>
      <div className="board-row">
        <Square value={squares[3]} onSquareClick={() => handleClick(3)} />
        <Square value={squares[4]} onSquareClick={() => handleClick(4)} />
        <Square value={squares[5]} onSquareClick={() => handleClick(5)} />
      </div>
      <div className="board-row">
        <Square value={squares[6]} onSquareClick={() => handleClick(6)} />
        <Square value={squares[7]} onSquareClick={() => handleClick(7)} />
        <Square value={squares[8]} onSquareClick={() => handleClick(8)} />
      </div>
    </>
  );
}

function calculateWinner(squares) {
  const lines = [
    [0, 1, 2],
    [3, 4, 5],
    [6, 7, 8],
    [0, 3, 6],
    [1, 4, 7],
    [2, 5, 8],
    [0, 4, 8],
    [2, 4, 6],
  ];
  for (let i = 0; i < lines.length; i++) {
    const [a, b, c] = lines[i];
    if (squares[a] && squares[a] === squares[b] && squares[a] === squares[c]) {
      return squares[a];
    }
  }
  return null;
}
ການເພີ່ມ time travel
ໃນແບບເຝິກຫັດສຸດທ້າຍ, ເຮົາມາເຮັດໃຫ້ “ຍ້ອນເວລາກັບໄປ” ໄປຫາການເຄື່ອນໄຫວກ່ອນໜ້າໃນເກມກັນ.
ການເກັບປະຫວັດການເຄື່ອນໄຫວ
ຖ້າທ່ານ mutate array squares, ການ implement time travel ຈະເປັນເລື່ອງທີ່ຍາກຫຼາຍ.
ເຖິງຢ່າງໃດກໍຕາມ, ຖ້າທ່ານໃຊ້ slice() ເພື່ອສ້າງສຳເນົາຂອງ array squares ຫຼັງຈາກທຸກໆການເຄື່ອນໄຫວ, ແລະ ຖືວ່າມັນ mutate ໄດ້. ການດຳເນີນການນີ້ຈະຊ່ວຍໃຫ້ທ່ານສາມາດຈັດການກັບ array squares ທຸກເວີຊັ່ນທີ່ຜ່ານມາ, ແລະ ໄປຫາລະຫວ່າງຜຽນຕ່າງໆທີ່ເກີດຂຶ້ນແລ້ວ.
ທ່ານຈະເກັບ array squares ໃນ array ອື່ນເອີ້ນວ່າ history, ເຊິ່ງທ່ານຈະຈັດເກັບເປັນຕົວແປ state ໃໝ່. Array history ສະແດງເຖິງ state ຂອງກະດານ, ຈາກຄັ້ງທຳອິດໄປຫາຄັ້ງສຸດທ້າຍ, ແລະ ມີຮູບຮ່າງດັ່ງນີ້:
[
  // Before first move
  [null, null, null, null, null, null, null, null, null],
  // After first move
  [null, null, null, null, 'X', null, null, null, null],
  // After second move
  [null, null, null, null, 'X', null, null, null, 'O'],
  // ...
]
ການຍົກ state ຂຶ້ນ, ອີກຄັ້ງ
ຕອນນີ້ທ່ານຈະຂຽນ component ຊື່ວ່າ Game ເພື່ອສະແດງລາຍການການເຄື່ອນໄຫວທີ່ຜ່ານມາ. ບ່ອນນັ້ນຈະວາງ state history ທີ່ປະກອບມີປະຫວັດເກມທັງໝົດ.
ການວາງ state history ລົງໃນ component Game ຈະຊ່ວຍໃຫ້ທ່ານລຶບ state squares ອອກຈາກ child component ຂອງ Board ຂອງມັນໄດ້. ເໝືອນກັບທີ່ທ່ານ “ຍົກ state ຂຶ້ນ” ຈາກ component Square ໄປເປັນ component Board, ທ່ານຈະຍົກ state ຈາກ Board ໄປເປັນ component Game ລະດັບເທິງສຸດ. ນີ້ເຮັດໃຫ້ component Game ຄວບຄຸມຂໍ້ມູນຂອງ Board ໄດ້ຢ່າງເຕັມທີ ແລະ ຊ່ວຍໃຫ້ component ສັ່ງໃຫ້ Board ສະແດງຜົນກ່ອນໜ້າຈາກ history.
ທຳອິດ, ເພີ່ມ component Game ດ້ວຍ export default. ໃຫ້ render component Board ແລະ ບາງ markup:
function Board() {
  // ...
}

export default function Game() {
  return (
    <div className="game">
      <div className="game-board">
        <Board />
      </div>
      <div className="game-info">
        <ol>{/*TODO*/}</ol>
      </div>
    </div>
  );
}
ຈື່ໄວ້ວ່າທ່ານກຳລັງລຶບ keyword export default ກ່ອນການປະກາດ function Board() { ແລະ ເພີ່ມກ່ອນການປະກາດ function Game() {. ເຊິ່ງຈະບອກໃຫ້ຟາຍ index.js ຂອງທ່ານໃຊ້ component Game ເປັນ component ລະດັບເທິງສຸດແທນ component Board. div ເພີ່ມເຕີມທີ່ return ໂດຍ component Game ເຮັດໃຫ້ມີບ່ອນວ່າງສຳລັບຂໍ້ມູນເກມທີ່ທ່ານຈະເພີ່ມລົງໃນກະດານພາຍຫຼັງ.
ເພີ່ມ state ໃນ component Game ເພື່ອຕິດຕາມຜູ້ຫຼິ້ນຄົນຕໍ່ໄປ ແລະ ປະຫວັດການເຄື່ອນໄຫວ:
export default function Game() {
  const [xIsNext, setXIsNext] = useState(true);
  const [history, setHistory] = useState([Array(9).fill(null)]);
  // ...
ສັງເກດວ່າ [Array(9).fill(null)] ເປັນ array ທີ່ມີລາຍການດຽວ, ເຊິ່ງຕົວມັນເອງເປັນ array ຂອງ 9 null.
ຫາກຕ້ອງການ render squares ສຳລັບການຍ້າຍປັດຈຸບັນ, ທ່ານຕ້ອງອ່ານ array squares ຈາກ history. ທ່ານບໍ່ຈຳເປັນຕ້ອງໃຊ້ useState ສຳລັບສິ່ງນີ້—ທ່ານມີຂໍ້ມູນພຽງພໍທີ່ຈະຄຳນວນໃນລະຫວ່າງການ render:
export default function Game() {
  const [xIsNext, setXIsNext] = useState(true);
  const [history, setHistory] = useState([Array(9).fill(null)]);
  const currentSquares = history[history.length - 1];
  // ...
ຈາກນັ້ນ, ສ້າງຟັງຊັ່ນ handlePlay ພາຍໃນ component Game ທີ່ component Board ຈະເອີ້ນໃຊ້ເພື່ອອັບເດດເກມ. ສົ່ງ xIsNext, currentSquares ແລະ handlePlay ເປັນ prop ຫາ component Board:
export default function Game() {
  const [xIsNext, setXIsNext] = useState(true);
  const [history, setHistory] = useState([Array(9).fill(null)]);
  const currentSquares = history[history.length - 1];

  function handlePlay(nextSquares) {
    // TODO
  }

  return (
    <div className="game">
      <div className="game-board">
        <Board xIsNext={xIsNext} squares={currentSquares} onPlay={handlePlay} />
        //...
  )
}
ມາເຮັດໃຫ້ component Board ຄວບຄຸມໂດຍ prop ທີ່ໄດ້ຮັບຢ່າງເຕັມທີ. ປ່ຽນ component Board ເພື່ອໃຊ້ 3 prop: xIsNext, squares, ແລະ ຟັງຊັ່ນໃໝ່ onPlay ທີ່ Board ສາມາດເອີ້ນໄດ້ດ້ວຍ array squares ທີ່ອັບເດດເມື່ອຜູ້ຫຼິ້ນທຳການເຄື່ອນໄຫວ. ຕໍ່ໄປ, ລຶບສອງແຖວທຳອິດຂອງຟັງຊັ່ນ Board ທີ່ເອີ້ນ useState:
function Board({ xIsNext, squares, onPlay }) {
  function handleClick(i) {
    //...
  }
  // ...
}
ຕອນນີ້ທຳການແທນທີ່ setSquares ແລະ setXIsNext ທີ່ເອີ້ນ handleClick ໃນ component Board ໂດຍການເອີ້ນຟັງຊັ່ນ onPlay ເທື່ອດຽວ ເພື່ອໃຫ້ component Game ສາມາດອັບເດດ Board ເມື່ອຜູ້ໃສ່ຄິກໃສ່ສີ່ຫຼ່ຽມ:
function Board({ xIsNext, squares, onPlay }) {
  function handleClick(i) {
    if (calculateWinner(squares) || squares[i]) {
      return;
    }
    const nextSquares = squares.slice();
    if (xIsNext) {
      nextSquares[i] = "X";
    } else {
      nextSquares[i] = "O";
    }
    onPlay(nextSquares);
  }
  //...
}
Component Board ຖືກຄວບຄຸມໂດຍ prop ທີ່ສົ່ງຜ່ານໄປຍັງ component Game. ທ່ານຕ້ອງໃຊ້ຟັງຊັ່ນ handlePlay ໃນ component Game ເພື່ອເຮັດໃຫ້ເກມເຮັດວຽກໄດ້ອີກຄັ້ງ.
handlePlay ຄວນເຮັດແນວໃດເມື່ອຖືກເອີ້ນໃຊ້? ຈື່ໄວ້ວ່າ Board ເຄີຍເອີ້ນ setSquares ດ້ວຍ array ທີ່ອັບເດດ; ຕອນນີ້ມັນສົ່ງຜ່ານ array squares ທີ່ອັບເດດແລ້ວໄປຫາ onPlay.
ຟັງຊັ່ນ handlePlay ຈຳເປັນຕ້ອງອັບເດດ state ຂອງ Game ເພື່ອ trigger ການ render ໃໝ່, ແຕ່ທ່ານບໍ່ມີຟັງຊັ່ນ setSquares ທີ່ທ່ານສາມາດເອີ້ນໄດ້ອີກ—ປັດຈຸບັນທ່ານກຳລັງໃຊ້ຕົວແປ state history ເພື່ອເກັບຂໍ້ມູນນີ້. ທ່ານຈະຕ້ອງອັບເດດ history ໂດຍຕໍ່ທ້າຍ array squares ທີ່ອັບເດດເປັນລາຍການປະຫວັດໃໝ່, ທີ່ທ່ານຕ້ອງການສະຫຼັບ xIsNext, ເຊັ່ນດຽວກັບທີ່ Board ເຄີຍເຮັດ:
export default function Game() {
  //...
  function handlePlay(nextSquares) {
    setHistory([...history, nextSquares]);
    setXIsNext(!xIsNext);
  }
  //...
}
ຕອນນີ້, [...history, nextSquares] ສ້າງ array ໃໝ່ທີ່ມີລາຍການທັງໝົດໃນ history, ຕາມດ້ວຍ nextSquares. (ທ່ານສາມາດອ່ານ ...history spread syntax ເປັນ “ລາຍການ enumerate ທັງໝົດໃນ history”.)
ຕົວຢ່າງ, ຖ້າ history ເປັນ [[null,null,null], ["X",null,null]] ແລະ nextSquares ເປັນ ["X",null,"O"], ດັ່ງນັ້ນ [...history, nextSquares] array ໃໝ່ຈະເປັນ [[null,null,null], ["X",null,null], ["X",null,"O"]].
ໃນຈຸດນີ້, ທ່ານໄດ້ຍ້າຍ state ໄປຢູ່ໃນ component Game, ແລະ UI ຄວນຈະເຮັດວຽກໄດ້ສົມບູນ, ຄືກັບທີ່ເປັນມາກ່ອນການ refactor. ນີ້ແມ່ນສິ່ງທີ່ code ທ່ານຄວນຈະເປັນໃນຈຸດນີ້:
import { useState } from 'react';

function Square({ value, onSquareClick }) {
  return (
    <button className="square" onClick={onSquareClick}>
      {value}
    </button>
  );
}

function Board({ xIsNext, squares, onPlay }) {
  function handleClick(i) {
    if (calculateWinner(squares) || squares[i]) {
      return;
    }
    const nextSquares = squares.slice();
    if (xIsNext) {
      nextSquares[i] = 'X';
    } else {
      nextSquares[i] = 'O';
    }
    onPlay(nextSquares);
  }

  const winner = calculateWinner(squares);
  let status;
  if (winner) {
    status = 'Winner: ' + winner;
  } else {
    status = 'Next player: ' + (xIsNext ? 'X' : 'O');
  }

  return (
    <>
      <div className="status">{status}</div>
      <div className="board-row">
        <Square value={squares[0]} onSquareClick={() => handleClick(0)} />
        <Square value={squares[1]} onSquareClick={() => handleClick(1)} />
        <Square value={squares[2]} onSquareClick={() => handleClick(2)} />
      </div>
      <div className="board-row">
        <Square value={squares[3]} onSquareClick={() => handleClick(3)} />
        <Square value={squares[4]} onSquareClick={() => handleClick(4)} />
        <Square value={squares[5]} onSquareClick={() => handleClick(5)} />
      </div>
      <div className="board-row">
        <Square value={squares[6]} onSquareClick={() => handleClick(6)} />
        <Square value={squares[7]} onSquareClick={() => handleClick(7)} />
        <Square value={squares[8]} onSquareClick={() => handleClick(8)} />
      </div>
    </>
  );
}

export default function Game() {
  const [xIsNext, setXIsNext] = useState(true);
  const [history, setHistory] = useState([Array(9).fill(null)]);
  const currentSquares = history[history.length - 1];

  function handlePlay(nextSquares) {
    setHistory([...history, nextSquares]);
    setXIsNext(!xIsNext);
  }

  return (
    <div className="game">
      <div className="game-board">
        <Board xIsNext={xIsNext} squares={currentSquares} onPlay={handlePlay} />
      </div>
      <div className="game-info">
        <ol>{/*TODO*/}</ol>
      </div>
    </div>
  );
}

function calculateWinner(squares) {
  const lines = [
    [0, 1, 2],
    [3, 4, 5],
    [6, 7, 8],
    [0, 3, 6],
    [1, 4, 7],
    [2, 5, 8],
    [0, 4, 8],
    [2, 4, 6],
  ];
  for (let i = 0; i < lines.length; i++) {
    const [a, b, c] = lines[i];
    if (squares[a] && squares[a] === squares[b] && squares[a] === squares[c]) {
      return squares[a];
    }
  }
  return null;
}
ສະແດງການເຄື່ອນໄຫວທີ່ຜ່ານມາ
ຕັ້ງແຕ່ທ່ານເກັບປະຫວັດຂອງເກມ tic-tac-toe, ທ່ານສາມາດສະແດງລາຍການເຄື່ອນໄຫວຂອງຜູ້ຫຼິ້ນ.
Element React ເຊັ່ນ <button> ແມ່ນ object JavaScript ທຳມະດາ; ທ່ານສາມາດສົ່ງຕໍ່ໄດ້ໃນແອັບພິເຄຊັ່ນຂອງທ່ານ. ເພື່ອ render ຫຼາຍລາຍການໃນ React, ທ່ານສາມາດໃຊ້ array ຂອງ element React.
ທ່ານມີ array ຂອງການເຄື່ອນໄຫວ history ໃນ state, ດັ່ງນັ້ນຕອນນີ້ທ່ານຕ້ອງແປງ array ຂອງ element React. ໃນ JavaScript, ຫາກຕ້ອງການແປງ array ໜຶ່ງໄປເປັນອີກ array, ທ່ານສາມາດໃຊ້ array map method:
[1, 2, 3].map((x) => x * 2) // [2, 4, 6]ທ່ານຈະໃຊ້ map ເພື່ອປ່ຽນ history ຂອງການເຄື່ອນໄຫວເປັນ element React ທີ່ສະແດງປຸ່ມເທິງໜ້າຈໍ, ແລະ ສະແດງລາຍການຂອງປຸ່ມເພື່ອ “ຂ້າມ” ໄປຫາການເຄື່ອນໄຫວທີ່ຜ່ານມາ. ມາ map ເໜືອ history ໃນ component Game:
export default function Game() {
  const [xIsNext, setXIsNext] = useState(true);
  const [history, setHistory] = useState([Array(9).fill(null)]);
  const currentSquares = history[history.length - 1];

  function handlePlay(nextSquares) {
    setHistory([...history, nextSquares]);
    setXIsNext(!xIsNext);
  }

  function jumpTo(nextMove) {
    // TODO
  }

  const moves = history.map((squares, move) => {
    let description;
    if (move > 0) {
      description = 'Go to move #' + move;
    } else {
      description = 'Go to game start';
    }
    return (
      <li>
        <button onClick={() => jumpTo(move)}>{description}</button>
      </li>
    );
  });

  return (
    <div className="game">
      <div className="game-board">
        <Board xIsNext={xIsNext} squares={currentSquares} onPlay={handlePlay} />
      </div>
      <div className="game-info">
        <ol>{moves}</ol>
      </div>
    </div>
  );
}
ທ່ານສາມາດເບິ່ງໄດ້ວ່າ code ຂອງທ່ານຄວນເປັນແນວໃດໃນດ້ານລຸ່ມນີ້. ສັງເກດວ່າທ່ານຄວນເຫັນຂໍ້ຜິດພາດໃນ console developer tools ທີ່ບອກວ່າ: Warning: Each child in an array or iterator should have a unique "key" prop. Check the render method of `Game`. ທ່ານຈະແປງຂໍ້ຜິດພາດນີ້ໃນຫົວຂໍ້ຕໍ່ໄປ.
import { useState } from 'react';

function Square({ value, onSquareClick }) {
  return (
    <button className="square" onClick={onSquareClick}>
      {value}
    </button>
  );
}

function Board({ xIsNext, squares, onPlay }) {
  function handleClick(i) {
    if (calculateWinner(squares) || squares[i]) {
      return;
    }
    const nextSquares = squares.slice();
    if (xIsNext) {
      nextSquares[i] = 'X';
    } else {
      nextSquares[i] = 'O';
    }
    onPlay(nextSquares);
  }

  const winner = calculateWinner(squares);
  let status;
  if (winner) {
    status = 'Winner: ' + winner;
  } else {
    status = 'Next player: ' + (xIsNext ? 'X' : 'O');
  }

  return (
    <>
      <div className="status">{status}</div>
      <div className="board-row">
        <Square value={squares[0]} onSquareClick={() => handleClick(0)} />
        <Square value={squares[1]} onSquareClick={() => handleClick(1)} />
        <Square value={squares[2]} onSquareClick={() => handleClick(2)} />
      </div>
      <div className="board-row">
        <Square value={squares[3]} onSquareClick={() => handleClick(3)} />
        <Square value={squares[4]} onSquareClick={() => handleClick(4)} />
        <Square value={squares[5]} onSquareClick={() => handleClick(5)} />
      </div>
      <div className="board-row">
        <Square value={squares[6]} onSquareClick={() => handleClick(6)} />
        <Square value={squares[7]} onSquareClick={() => handleClick(7)} />
        <Square value={squares[8]} onSquareClick={() => handleClick(8)} />
      </div>
    </>
  );
}

export default function Game() {
  const [xIsNext, setXIsNext] = useState(true);
  const [history, setHistory] = useState([Array(9).fill(null)]);
  const currentSquares = history[history.length - 1];

  function handlePlay(nextSquares) {
    setHistory([...history, nextSquares]);
    setXIsNext(!xIsNext);
  }

  function jumpTo(nextMove) {
    // TODO
  }

  const moves = history.map((squares, move) => {
    let description;
    if (move > 0) {
      description = 'Go to move #' + move;
    } else {
      description = 'Go to game start';
    }
    return (
      <li>
        <button onClick={() => jumpTo(move)}>{description}</button>
      </li>
    );
  });

  return (
    <div className="game">
      <div className="game-board">
        <Board xIsNext={xIsNext} squares={currentSquares} onPlay={handlePlay} />
      </div>
      <div className="game-info">
        <ol>{moves}</ol>
      </div>
    </div>
  );
}

function calculateWinner(squares) {
  const lines = [
    [0, 1, 2],
    [3, 4, 5],
    [6, 7, 8],
    [0, 3, 6],
    [1, 4, 7],
    [2, 5, 8],
    [0, 4, 8],
    [2, 4, 6],
  ];
  for (let i = 0; i < lines.length; i++) {
    const [a, b, c] = lines[i];
    if (squares[a] && squares[a] === squares[b] && squares[a] === squares[c]) {
      return squares[a];
    }
  }
  return null;
}
ເມື່ອທ່ານ iterate ຜ່ານ array history ພາຍໃນຟັງຊັ່ນທີ່ທ່ານສົ່ງຜ່ານໄປຍັງ map, argument squares ຈະຜ່ານແຕ່ລະ element ຂອງ history, ແລະ argument move ຈະຜ່ານແຕ່ລະ index: 0, 1, 2, …. (ໃນກໍລະນີສ່ວນຫຼາຍ, ທ່ານຕ້ອງໃຊ້ array element ແທ້, ແຕ່ຫາກຕ້ອງການ render ລາຍການການເຄື່ອນໄຫວທ່ານຈະຕ້ອງໃຊ້ index ເທົ່ານັ້ນ.)
ສຳລັບການເຄື່ອນໄຫວແຕ່ລະຄັ້ງໃນປະຫວັດຂອງເກມ tic-tac-toe, ທ່ານສ້າງລາຍການ <li> ເຊິ່ງມີປຸ່ມ <button>. ປຸ່ມມີ່ onClick handler ເຊິ່ງຈະເອີ້ນຟັງຊັ່ນທີ່ເອີ້ນວ່າ jumpTo (ທີ່ທ່ານຍັງບໍ່ທັນໄດ້ implement ເທື່ອ).
ສຳລັບຕອນນີ້, ທ່ານຄວນເຫັນລາຍການເຄື່ອນໄຫວທີ່ເກີດຂຶ້ນໃນເກມ ແລະ ຂໍ້ຜິດພາດໃນ console developer tools. ມາລົມກັນວ່າາຂໍ້ຜິດພາດ “key” ໝາຍເຖິງຫຍັງ.
ການເລືອກ key
ເມື່ອທ່ານ render ລາຍການ, React ຈະເກັບຂໍ້ມູນບາງຢ່າງກ່ຽວກັບແຕ່ລະລາຍການທີ່ render. ເມື່ອທ່ານອັບເດດລາຍການ, React ຈຳເປັນຕ້ອງພິຈາລະນາວ່າມີການປ່ຽນແປງຫຍັງແນ່. ທ່ານສາມາດເພີ່ມ, ລຶບ, ຈັດວາງໃໝ່, ຫຼື ອັບເດດລາຍການ.
ຈິນຕະນາການປ່ຽນຈາກ
<li>Alexa: 7 tasks left</li>
<li>Ben: 5 tasks left</li>
ເປັນ
<li>Ben: 9 tasks left</li>
<li>Claudia: 8 tasks left</li>
<li>Alexa: 5 tasks left</li>
ນອກເໜືອຈາກການອັບເດດ count ແລ້ວ, ການອ່ານໂດຍມະນຸດອາດບອກວ່າທ່ານສະຫຼັບຄຳສັ່ງຂອງ Alexa ແລະ Ben ແລະ ເພີ່ມ Claudia ລະຫວ່າງ Alexa ແລະ Ben. ເຖິງຢ່າງໃດກໍຕາມ, React ເປັນໂປຣແກຣມຄອມພິວເຕີ ແລະ ບໍ່ສາມາດຮູ້ວ່າທ່ານຕ້ອງການຫຍັງ, ດັ່ງນັ້ນທ່ານຕ້ອງໄດ້ລະບຸ key property ສຳລັບແຕ່ລະລາຍການໃນລາຍການເພື່ອແຍກຄວາມແຕກຕ່າງລະຫວ່າງແຕ່ລະລາຍການຂອງກັນ ແລະ ກັນ. ຖ້່າຂໍ້ມູນຂອງທ່ານມາຈາກຖານຂໍ້ມູນ, ID ຖານຂໍ້ມູນ Alexa, Ben ແລະ Claudia ສາມາດໃຊ້ເປັນ key ໄດ້.
<li key={user.id}>
  {user.name}: {user.taskCount} tasks left
</li>
ເມື່ອລາຍການຖືກ render ໃໝ່, React ຈະໃຊ້ key ຂອງແຕ່ລະລາຍການ ແລະ ຄົ້ນຫາ key ທີ່ກົງກັນໃນລາຍການກ່ອນໜ້າຂອງລາຍການ. ຖ້າລາຍການປັດຈຸບັນມີ key ທີ່ບໍ່ເຄີຍມີມາກ່ອນ, React ຈະສ້າງ component. ຖ້າລາຍການປັດຈຸບັນບໍ່ມີ key ທີ່ມີຢູ່ໃນລາຍການກ່ອນໜ້າ, React ຈະທຳລາຍ component ກ່ອນໜ້າ. ຫາກສອງ key ກົງກັນ, component ທີ່ກ່ຽວຂ້ອງຈະຖືກຍ້າຍ.
Key ຈະບອກ React ກ່ຽວກັບເອກະລັກຂອງແຕ່ລະ component, ເຊິ່ງຊ່ວຍໃຫ້ React ຮັກສາ state ລະຫວ່າງການ render ໃໝ່. ຖ້າ key ຂອງ component ມີການປ່ຽນແປງ, component ຈະຖືກທຳລາຍ ແລະ ຖືກສ້າງໃໝ່ພ້ອມ state ໃໝ່ດ້ວຍ.
key ເປັນ property ພິເສດ ແລະ ຖືກສະຫງວນໄວ້ໃນ React. ເມື່ອ element ຖືກສ້າງ, React ຈະແຍກ property key ແລະ ເກັບ key ໂດຍກົງຕອນ return element. ເຖິງວ່າ key ອາດຈະເບິ່ງຄືວ່າມັນຖືກສົ່ງຜ່ານເປັນ prop, ແຕ່ React ຈະໃຊ້ key ໂດຍອັດຕະໂນມັດເພື່ອຕັດສິນວ່າຈະອັບເດດ component ໃດ. ບໍ່ມີທາງທີ່ component ຈະຖາມວ່າ key ໃດທີ່ parent ລະບຸ.
ແນະນຳເປັນຢ່າງສູງໃຫ້ທ່ານກຳນົດ key ທີ່ເໝາະສົມທຸກຄັ້ງທີທ່ານສ້າງລາຍການແບບ dynamic. ຖ້າທ່ານບໍ່ມີ key ທີ່ເໝາະສົມທ່ານອາດຈະຕ້ອງພິຈາລະນາໂຄ່ງສ້າງຂໍ້ມູນໃໝ່ເພື່ອໃຫ້ສາມາດຈັດການໄດ້.
ຖ້າບໍ່ໄດ້ລະບຸ key, React ຈະລາຍງານຂໍ້ຜິດພາດ ແລະ ໃຊ້ index array ເປັນ key ຕາມຄ່າເລີ່ມຕົ້ນ. ການໃຊ້ index array ເປັນ key ຈະມີບັນຫາເມື່ອພະຍາຍາມຈັດລຳດັບລາຍການຂອງລາຍການໃໝ່ ຫຼື ເພີ່ມ/ລຶບ ລາຍການ. ການຜ່ານ key={i} ຢ່າງຊັດເຈນເປັນການປິດສຽງຂໍ້ຜິດພາດແຕ່ມີບັນຫາເຊັ່ນດຽວກັບ index array ແລະ ບໍ່ແນະນຳໃນກໍລະນີສ່ວນໃຫຍ່.
Key ບໍ່ຈຳເປັນຕ້ອງຊໍ້າກັນທັງໝົດ; ມັນຕ້ອງບໍ່ຊໍ້າກັນລະຫວ່າງ component ແລະ component ກັນເອງ.
ການ Implement time travel
ໃນປະຫວັດຂອງເກມ tic-tac-toe, ການເຄື່ອນໄຫວຜ່ານມາແຕ່ລະຄັ້ງຈະມີ ID ສະເພາະທີ່ກ່ຽວຂ້ອງ: ນັ້ນຄືໝາຍເລກລຳດັບລາຍການເຄື່ອນໄຫວ. ການຍ້າຍຈະບໍ່ຖືກສັ່ງຊໍ້າ, ລຶບ ຫຼື ເພີ່ມທາງກາງ, ສະນັ້ນຈຶ່ງປອດໄພທີ່ຈະໃຊ້ index ການຍ້າຍເປັນ key.
ໃນຟັງຊັ່ນ Game, ທ່ານສາມາດເພີ່ມ key ເປັນ <li key={move}>, ແລະ ຖ້າທ່ານໂຫຼດເກມທີ່ render ຊໍ້າ, ຂໍ້ຜິດພາດ “key” ຂອງ React ຈະຫາຍໄປ:
const moves = history.map((squares, move) => {
  //...
  return (
    <li key={move}>
      <button onClick={() => jumpTo(move)}>{description}</button>
    </li>
  );
});import { useState } from 'react'; function Square({ value, onSquareClick }) { return ( <button className="square" onClick={onSquareClick}> {value} </button> ); } function Board({ xIsNext, squares, onPlay }) { function handleClick(i) { if (calculateWinner(squares) || squares[i]) { return; } const nextSquares = squares.slice(); if (xIsNext) { nextSquares[i] = 'X'; } else { nextSquares[i] = 'O'; } onPlay(nextSquares); } const winner = calculateWinner(squares); let status; if (winner) { status = 'Winner: ' + winner; } else { status = 'Next player: ' + (xIsNext ? 'X' : 'O'); } return ( <> <div className="status">{status}</div> <div className="board-row"> <Square value={squares[0]} onSquareClick={() => handleClick(0)} /> <Square value={squares[1]} onSquareClick={() => handleClick(1)} /> <Square value={squares[2]} onSquareClick={() => handleClick(2)} /> </div> <div className="board-row"> <Square value={squares[3]} onSquareClick={() => handleClick(3)} /> <Square value={squares[4]} onSquareClick={() => handleClick(4)} /> <Square value={squares[5]} onSquareClick={() => handleClick(5)} /> </div> <div className="board-row"> <Square value={squares[6]} onSquareClick={() => handleClick(6)} /> <Square value={squares[7]} onSquareClick={() => handleClick(7)} /> <Square value={squares[8]} onSquareClick={() => handleClick(8)} /> </div> </> ); } export default function Game() { const [xIsNext, setXIsNext] = useState(true); const [history, setHistory] = useState([Array(9).fill(null)]); const currentSquares = history[history.length - 1]; function handlePlay(nextSquares) { setHistory([...history, nextSquares]); setXIsNext(!xIsNext); } function jumpTo(nextMove) { // TODO } const moves = history.map((squares, move) => { let description; if (move > 0) { description = 'Go to move #' + move; } else { description = 'Go to game start'; } return ( <li key={move}> <button onClick={() => jumpTo(move)}>{description}</button> </li> ); }); return ( <div className="game"> <div className="game-board"> <Board xIsNext={xIsNext} squares={currentSquares} onPlay={handlePlay} /> </div> <div className="game-info"> <ol>{moves}</ol> </div> </div> ); } function calculateWinner(squares) { const lines = [ [0, 1, 2], [3, 4, 5], [6, 7, 8], [0, 3, 6], [1, 4, 7], [2, 5, 8], [0, 4, 8], [2, 4, 6], ]; for (let i = 0; i < lines.length; i++) { const [a, b, c] = lines[i]; if (squares[a] && squares[a] === squares[b] && squares[a] === squares[c]) { return squares[a]; } } return null; }
ກ່ອນທີ່ທ່ານຈະໃຊ້ implement jumpTo, ທ່ານຕ້ອງມີ component Game ເພື່ອຕິດຕາມວ່າຜູ້ໃຊ້ກຳລັງເບິ່ງຂັ້ນຕອນໃດຢູ່. ໃນການດຳເນີນການນີ້, ໃຫ້ກຳນົດຕົວແປ state ໃໝ່ ຊື່ວ່າ currentMove, ໃສ່ຄ່າເລີ່ມຕົ້ນເປັນ 0:
export default function Game() {
  const [xIsNext, setXIsNext] = useState(true);
  const [history, setHistory] = useState([Array(9).fill(null)]);
  const [currentMove, setCurrentMove] = useState(0);
  const currentSquares = history[history.length - 1];
  //...
}
ຕໍ່ໄປ, ອັບເດດຟັງຊັ່ນ jumpTo ພາຍໃນ Game ເພື່ອອັບເດດ currentMove. ທ່ານຈະຕ້ອງຕັ້ງຄ່າ xIsNext ເປັນ true ຫາກຕົວເລກທີ່ທ່ານປ່ຽນ currentMove ເປັນເລກຄູ່.
export default function Game() {
  // ...
  function jumpTo(nextMove) {
    setCurrentMove(nextMove);
    setXIsNext(nextMove % 2 === 0);
  }
  //...
}
ຕອນນີ້ທ່ານຈະຕ້ອງປ່ຽນແປງສອງຄັ້ງກັບຟັງຊັ່ນ handlePlay ຂອງ Game ເຊິ່ງຈະຖືກເອີ້ນໃຊ້ເມື່ອທ່ານຄິກໃສ່ສີ່ຫຼ່ຽມ.
- ຖ້າທ່ານ “ຍ້ອນເວລາກັບໄປ” ແລ້ວທຳການຍ້າຍເທື່ອໃໝ່ຈາກຈຸດນັ້ນ, ທ່ານພຽງຕ້ອງການເກັບປະຫວັດໄວ້ຈົນຮອດຈຸດນັ້ນ. ແທນທີ່ຈະເພີ່ມ
nextSquaresຫຼັງລາຍການທັງໝົດ (...syntax spread) ໃນhistory, ທ່ານຈະເພີ່ມລາຍການທັງໝົດໃນhistory.slice(0, currentMove + 1)ເພື່ອໃຫ້ທ່ານຮັກສາສ່ວນນັ້ນຂອງປະຫວັດເກົ່າ. - ທຸກຄັ້ງທີ່ມີການຍ້າຍ, ທ່ານຕ້ອງອັບເດດ
currentMoveເພື່ອຊີ້ໄປທີ່ລາຍການປະຫວັດຫຼ້າສຸດ.
function handlePlay(nextSquares) {
  const nextHistory = [...history.slice(0, currentMove + 1), nextSquares];
  setHistory(nextHistory);
  setCurrentMove(nextHistory.length - 1);
  setXIsNext(!xIsNext);
}
ສຸດທ້າຍ, ທ່ານຈະແກ້ໄຂ component Game ເພື່ອສະແດງຜົນການເຄື່ອນໄຫວທີ່ຖືກເລືອກປັດຈຸບັນ, ແທນທີ່ຈະສະແດງການເຄື່ອນໄຫວຄັ້ງສຸດທ້າຍສະເໝີ:
export default function Game() {
  const [xIsNext, setXIsNext] = useState(true);
  const [history, setHistory] = useState([Array(9).fill(null)]);
  const [currentMove, setCurrentMove] = useState(0);
  const currentSquares = history[currentMove];

  // ...
}
ຖ້າທ່ານຄິກຂັ້ນຕອນໃດໃນປະຫວັດຂອງເກມ, ກະດານ tic-tac-toe ຄວນອັບເດດທັນທີເພື່ອສະແດງລັກສະນະຂອງກະດານຫຼັງຈາກຂັ້ນຕອນນັ້ນເກີດຂຶ້ນ.
import { useState } from 'react';

function Square({value, onSquareClick}) {
  return (
    <button className="square" onClick={onSquareClick}>
      {value}
    </button>
  );
}

function Board({ xIsNext, squares, onPlay }) {
  function handleClick(i) {
    if (calculateWinner(squares) || squares[i]) {
      return;
    }
    const nextSquares = squares.slice();
    if (xIsNext) {
      nextSquares[i] = 'X';
    } else {
      nextSquares[i] = 'O';
    }
    onPlay(nextSquares);
  }

  const winner = calculateWinner(squares);
  let status;
  if (winner) {
    status = 'Winner: ' + winner;
  } else {
    status = 'Next player: ' + (xIsNext ? 'X' : 'O');
  }

  return (
    <>
      <div className="status">{status}</div>
      <div className="board-row">
        <Square value={squares[0]} onSquareClick={() => handleClick(0)} />
        <Square value={squares[1]} onSquareClick={() => handleClick(1)} />
        <Square value={squares[2]} onSquareClick={() => handleClick(2)} />
      </div>
      <div className="board-row">
        <Square value={squares[3]} onSquareClick={() => handleClick(3)} />
        <Square value={squares[4]} onSquareClick={() => handleClick(4)} />
        <Square value={squares[5]} onSquareClick={() => handleClick(5)} />
      </div>
      <div className="board-row">
        <Square value={squares[6]} onSquareClick={() => handleClick(6)} />
        <Square value={squares[7]} onSquareClick={() => handleClick(7)} />
        <Square value={squares[8]} onSquareClick={() => handleClick(8)} />
      </div>
    </>
  );
}

export default function Game() {
  const [xIsNext, setXIsNext] = useState(true);
  const [history, setHistory] = useState([Array(9).fill(null)]);
  const [currentMove, setCurrentMove] = useState(0);
  const currentSquares = history[currentMove];

  function handlePlay(nextSquares) {
    const nextHistory = [...history.slice(0, currentMove + 1), nextSquares];
    setHistory(nextHistory);
    setCurrentMove(nextHistory.length - 1);
    setXIsNext(!xIsNext);
  }

  function jumpTo(nextMove) {
    setCurrentMove(nextMove);
    setXIsNext(nextMove % 2 === 0);
  }

  const moves = history.map((squares, move) => {
    let description;
    if (move > 0) {
      description = 'Go to move #' + move;
    } else {
      description = 'Go to game start';
    }
    return (
      <li key={move}>
        <button onClick={() => jumpTo(move)}>{description}</button>
      </li>
    );
  });

  return (
    <div className="game">
      <div className="game-board">
        <Board xIsNext={xIsNext} squares={currentSquares} onPlay={handlePlay} />
      </div>
      <div className="game-info">
        <ol>{moves}</ol>
      </div>
    </div>
  );
}

function calculateWinner(squares) {
  const lines = [
    [0, 1, 2],
    [3, 4, 5],
    [6, 7, 8],
    [0, 3, 6],
    [1, 4, 7],
    [2, 5, 8],
    [0, 4, 8],
    [2, 4, 6],
  ];
  for (let i = 0; i < lines.length; i++) {
    const [a, b, c] = lines[i];
    if (squares[a] && squares[a] === squares[b] && squares[a] === squares[c]) {
      return squares[a];
    }
  }
  return null;
}
Cleanup ເທື່ອສຸດທ້າຍ
ຖ້າທ່ານເບິ່ງ code ຢ່າງໃກ້ຊິດ, ທ່ານຈະສັງເກດວ່າ xIsNext === true ເມື່ອ currentMove ເປັນເລກຄູ່ ແລະ xIsNext === false ເມື່ອ currentMove ເປັນເລກຄີກ. ໃນຄວາມໝາຍໜຶ່ງ, ຖ້າທ່ານຮູ້ຄ່າຂອງ currentMove, ທ່ານກໍຈະຮູ້ວ່າ xIsNext ຄວນເປັນແນວໃດ.
ບໍ່ມີເຫດຜົນໃດທີ່ທ່ານຈະເກັບສອງສິ່ງນີ້ໄວ້ໃນ state. ໃນຄວາມເປັນຈິງ, ພະຍາຍາມຫຼີກຫຼ່ຽງ state ທີ່ຊໍ້າຊ້ອນ. ການຫຼຸດຄວາມຊໍ້າຊ້ອນຂອງສິ່ງທີ່ທ່ານຈະຈັດເກັບໃນ state ຈະຫຼຸດ bug ແລະ ເຮັດໃຫ້ code ຂອງທ່ານເຂົ້າໃຈງ່າຍຂຶ້ນ. ປ່ຽນ Game ເພື່ອບໍ່ໃຫ້ເກັບ xIsNext ເປັນຕົວແປ state ແຍກຕ່າງຫາກ ແລະ ແທນທີ່ຈະໄປຕາມ currentMove:
export default function Game() {
  const [history, setHistory] = useState([Array(9).fill(null)]);
  const [currentMove, setCurrentMove] = useState(0);
  const xIsNext = currentMove % 2 === 0;
  const currentSquares = history[currentMove];

  function handlePlay(nextSquares) {
    const nextHistory = [...history.slice(0, currentMove + 1), nextSquares];
    setHistory(nextHistory);
    setCurrentMove(nextHistory.length - 1);
  }

  function jumpTo(nextMove) {
    setCurrentMove(nextMove);
  }
  // ...
}
ທ່ານບໍ່ຈຳເປັນຕ້ອງມີການປະກາດ state xIsNext ຫຼື ການເອີ້ນໃຊ້ setXIsNext ອີກຕໍ່ໄປ. ຕອນນີ້, ບໍ່ມີໂອກາດທີ່ xIsNext ຈະ sync ກັບ currentMove, ເຖິງວ່າທ່ານຈະເຮັດຜິດພາດໃນຂະນະຂຽນ code component ກໍຕາມ.
ສະຫຼຸບ
ຂໍສະແດງຄວາມຍິນດີ! ທ່ານໄດ້ສ້າງເກມ tic-tac-toe ທີ:
- ໃຫ້ທ່ານຫຼິ້ນ tic-tac-toe,
- ລະບຸເມື່ອຜູ້ຫຼິ້ນຊະນະເກມ,
- ຈັດເກັບປະຫວັດຂອງເກມໃນຂະນະທີ່ເກມດຳເນີນໄປ,
- ອະນຸຍາດໃຫ້ຜູ້ຫຼິ້ນກວດປະຫວັດຂອງເກມ ແລະ ເບິ່ງເວີຊັ່ນກ່ອນໜ້າຂອງກະດານເກມ.
ເຮັດໄດ້ດີຫຼາຍ! ພວກເຮົາຫວັງວ່າທ່ານຈະຮູ້ສຶກວ່າທ່ານເຂົ້າໃຈແລ້ວວ່າ React ນັ້ນເຮັດວຽກແນວໃດ.
ກວດຜົນລັບສຸດທ້າຍບ່ອນນີ້:
import { useState } from 'react';

function Square({ value, onSquareClick }) {
  return (
    <button className="square" onClick={onSquareClick}>
      {value}
    </button>
  );
}

function Board({ xIsNext, squares, onPlay }) {
  function handleClick(i) {
    if (calculateWinner(squares) || squares[i]) {
      return;
    }
    const nextSquares = squares.slice();
    if (xIsNext) {
      nextSquares[i] = 'X';
    } else {
      nextSquares[i] = 'O';
    }
    onPlay(nextSquares);
  }

  const winner = calculateWinner(squares);
  let status;
  if (winner) {
    status = 'Winner: ' + winner;
  } else {
    status = 'Next player: ' + (xIsNext ? 'X' : 'O');
  }

  return (
    <>
      <div className="status">{status}</div>
      <div className="board-row">
        <Square value={squares[0]} onSquareClick={() => handleClick(0)} />
        <Square value={squares[1]} onSquareClick={() => handleClick(1)} />
        <Square value={squares[2]} onSquareClick={() => handleClick(2)} />
      </div>
      <div className="board-row">
        <Square value={squares[3]} onSquareClick={() => handleClick(3)} />
        <Square value={squares[4]} onSquareClick={() => handleClick(4)} />
        <Square value={squares[5]} onSquareClick={() => handleClick(5)} />
      </div>
      <div className="board-row">
        <Square value={squares[6]} onSquareClick={() => handleClick(6)} />
        <Square value={squares[7]} onSquareClick={() => handleClick(7)} />
        <Square value={squares[8]} onSquareClick={() => handleClick(8)} />
      </div>
    </>
  );
}

export default function Game() {
  const [history, setHistory] = useState([Array(9).fill(null)]);
  const [currentMove, setCurrentMove] = useState(0);
  const xIsNext = currentMove % 2 === 0;
  const currentSquares = history[currentMove];

  function handlePlay(nextSquares) {
    const nextHistory = [...history.slice(0, currentMove + 1), nextSquares];
    setHistory(nextHistory);
    setCurrentMove(nextHistory.length - 1);
  }

  function jumpTo(nextMove) {
    setCurrentMove(nextMove);
  }

  const moves = history.map((squares, move) => {
    let description;
    if (move > 0) {
      description = 'Go to move #' + move;
    } else {
      description = 'Go to game start';
    }
    return (
      <li key={move}>
        <button onClick={() => jumpTo(move)}>{description}</button>
      </li>
    );
  });

  return (
    <div className="game">
      <div className="game-board">
        <Board xIsNext={xIsNext} squares={currentSquares} onPlay={handlePlay} />
      </div>
      <div className="game-info">
        <ol>{moves}</ol>
      </div>
    </div>
  );
}

function calculateWinner(squares) {
  const lines = [
    [0, 1, 2],
    [3, 4, 5],
    [6, 7, 8],
    [0, 3, 6],
    [1, 4, 7],
    [2, 5, 8],
    [0, 4, 8],
    [2, 4, 6],
  ];
  for (let i = 0; i < lines.length; i++) {
    const [a, b, c] = lines[i];
    if (squares[a] && squares[a] === squares[b] && squares[a] === squares[c]) {
      return squares[a];
    }
  }
  return null;
}
ຖ້າທ່ານມີເວລາເພີ່ມ ຫຼື ຕ້ອງການເຝິກຝົນທັກສະ React ໃໝ່, ຕໍ່ໄປນີ້ແມ່ນບາງແນວຄິດສຳລັບປັບປຸງທີ່ທ່ານສາມາດເຮັດໄດ້ກັບເກມ tic-tac-toe, ໂດຍຮຽງຕາມລຳດັບຄວາມຍາກທີ່ເພີ່ມຂຶ້ນ:
- ສຳລັບການຍ້າຍປັດຈຸບັນເທົ່ານັ້ນ, ສະແດງ “You are at move #…” ແທນປຸ່ມ.
- ຂຽນ
Boardໃໝ່ເພື່ອໃຊ້ loop ສອງຮອບເພື່ອສ້າງສີ່ຫຼ່ຽມແທນການ hardcode. - ເພີ່ມປຸ່ມ toggle ທີ່ໃຫ້ທ່ານຮຽງລຳດັບການເຄື່ອນໄຫວໃນລຳດັບຈາກນ້ອຍໄປຫາຫຼາຍ ຫຼື ຈາກຫຼາຍໄປຫານ້ອຍ.
- ເມື່ອມີ່ຜູ້ຊະນະ, highlight ສາມ ສີ່ຫຼ່ຽມທີ່ເຮັດໃຫ້ເກີດການຊະນະ (ແລະ ເມື່ອບໍ່ມີໃຜຊະນະ, ໃຫ້ສະແດງຂໍ້ຄວາມກ່ຽວກັບຜົນສະເໝີ).
- ສະແດງຕໍແໜ່ງສຳລັບການເຄື່ອນໄຫວແຕ່ລະຄັ້ງໃນຮູບແບບ (ແຖວ, ຖັນ) ໃນລາຍການປະຫວັດການເຄື່ອນໄຫວ.
ຕະຫຼອດບົດສອນນີ້, ທ່ານໄດ້ສຳພັດກັບແນວຄິດຂອງ React ປະກອບມີ element, component, prop ແລະ state. ຕອນນີ້ທ່ານໄດ້ເຫັນວ່າແນວຄິດເຫຼົ່ານີ້ເຮັດວຽກແນວໃດເມື່ອສ້າງເກມ, ເບິ່ງ ຄິດແບບ React ເພື່ອເບິ່ງວ່າແນວຄິດດຽວກັນຂອງ React ເຮັດວຽກແນວໃດເມື່ອສ້າງ UI ຂອງແອັບ.